This is part of a tutorial series. If you feel a bit lost, I suggest following the tutorial in order:
- Connecting a DS18B20 thermal sensor to your Raspberry Pi – Raspberry Pi Temperature Monitoring Part 1
- Connecting a LCD1602 with an I2C module to your Raspberry Pi – Raspberry Pi Temperature Monitoring Part 2
- Using C to monitor temperatures through your DS18B20 thermal sensor – Raspberry Pi Temperature Monitoring Part 3
Just interested in the code? – https://github.com/albertherd/DS18B20Reader
This article assumes that you’ve configured one or more DS18B20 sensors to your Raspberry Pi and configured your Raspberry Pi to work with an LCD1602. If you did not, read the above mentioned links.
Okay – this should be a quick post – most of the heavy lifting is done. Remember the LCD1602 library that we’ve used in the second tutorial? We’ll be using that to simply get the temperature we’ve captured in third tutorial and display it.
We’ll need to do the following changes:
- Import the LCD1602 library.
- Initialize the LCD1602 on application startup.
- Read and display information on the LCD1602.
- Cleanup resources before exiting – this is important since we’ll need to turn off the backlight after usage.
Import the LCD1602 library
Get a copy of this repository – either by cloning or simply copying lcd1602.c and lcd1602.h files to your solution. We’ll be also adding them to our CMake file – it should look something of the sort. I’ve left the solution on debug in this case.
set(SOURCE main.c sensor.c lcd1602.c main.h sensor.h lcd1602.h)
set(CMAKE_BUILD_TYPE Debug)
add_executable(DS18B20Reader ${SOURCE})
Now it’s simply just adding a reference to the lcd1602.h in the solution. Next!
Initialize the LCD1602 on application startup
We’ll need to initialize the library and open a connection to the display under the right address – check your device address by checking the third tutorial. To simplify things, I hard-coded the value which is 0x27 in my case. Call this when initializing the application.
void InitializeLCD()
{
    int rc;
	rc = lcd1602Init(1, LCDADDRESS);
	if (rc)
	{
		printf("Initialization failed; aborting...\n");
		return;
	}
}
Read and display information on the LCD1602
We’ll be modifying our main loop to output content to the console (not important though and output to the LCD1602 screen. The main adjustment we’ve did in the main loop is that we’ve broken down our output to two functions – Outputting to console (not important) and outputting to the LCD1602 – Let’s see the main loop:
void ReadTemperatureLoop(SensorList *sensorList)
{
    while(!sigintFlag)
    {
        for(int i = 0; i SensorCount; i++)
        {
            float temperature = ReadTemperature(sensorList->Sensors[i]);
            PrintTemperatueToLCD1602(sensorList->Sensors[i], i % LCD1602LINES, temperature);
            LogTemperature(sensorList->Sensors[i], temperature);
        }
    }
}
Let’s now have a look at the important method – PrintTemperatueToLCD1602. Keeping in mind that the LCD1602 has two lines, we’ll be receiving the calculated line number as a parameter. This will make sure that values will lie between 0 and 1 only using modulus.
We’ll also need to remember that each line will hold up to 16 characters, so we’re truncating anything more than 16 characters (actually 16 + 1 for null termination). We’ll then just pass the (potentially truncated) string to the LCD1602 and et voila!
void PrintTemperatueToLCD1602(Sensor *sensor, int lineToPrintDataOn, float temperature)
{
    char temperatureString[LCD1602CHARACTERS + 1];
    snprintf(temperatureString, LCD1602CHARACTERS + 1, "%s : %.2fC", sensor->SensorName, temperature);

    lcd1602SetCursor(0, lineToPrintDataOn);
    lcd1602WriteString(temperatureString);
}
Cleanup resources before exiting
After we’re done, it’s just a matter of cleaning up resources. As previously mentioned, this is important since we’ll need to turn off the backlight after usage. In the cleanup method, we’re just calling the lcd1602Shutdown method.
void Cleanup(SensorList *sensorList)
{
    printf("Exiting...\n");
    FreeSensors(sensorList);
    lcd1602Shutdown();
}
Fetch a complete copy of the code from from GitHub – https://github.com/albertherd/DS18B20Reader
Let’s run the application! In a terminal with git and cmake installed, run the following commands
git clone https://github.com/albertherd/DS18B20Reader

cd ./DS18B20Reader

cmake . && make && ./DS18B20Reader "Sensor"
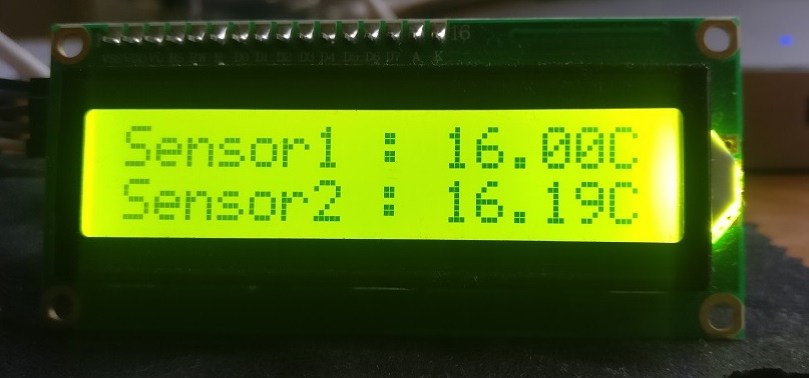
With some luck, your LCD1602 should display something like the below. In my case I have two sensors so I’ve fired up the application using the following syntax:
./DS18B20Reader "Sensor1" "Sensor2"
Until the next one!

Hi nice readding your blog
LikeLike