
Ever since I have written my experience using Precision Boost Overdrive 2 and Curve optimizer in my last blog post, I have been asked several questions on how to overclock your Ryzen 5000 CPU. Let’s discuss the basics for overclocking on Ryzen 5000.
Please treat this guide as a beginner starting guide – you’ll need to spend a lot of time tweaking, especially on the curve optimizer. This is not an ultimate overclocking guide and some people might (and already did) not agree with the values and flow of this guide. Having said that, even if other approaches may be better, they will be slightly better, maybe 1-3% better, within margin of error. Following this guide WILL net you a performance gain; maybe not the BEST performance gain but a measurable one.
The following guide should work for the following CPUs:
- Ryzen 9 5950x
- Ryzen 9 5900x
- Ryzen 7 5800x
- Ryzen 5 5600x
The following should similarly work for Ryzen 3000 series, but you will not have access to the Curve Optimizer. Blame AMD for this.
Ryzen 5000 – Traditional overclocking is dead
Traditional overclocking involved going into the BIOS, typing a nice voltage and a reasonable clock speed and you are done. You can do it, and you will get a nice score in Cinebench, but you’ll lose everyday performance. Why?
By turning on a fixed max boost clock, you will be losing the higher boost clocks achieved when doing lightly threaded workloads (unless you manage to overclock to a fixed 5Ghz..if you do that, please write a guide for us!). These are the kind of workloads that you go through every day, which are the most important. If you set a max overclock of say 4.6 GHz, you won’t be able to go over 4.6 GHz in common tasks, which will slow them down.
Ryzen’s boost algorithm is smart
On the other hand, Ryzen’s boost algorithm is designed to go past the usual clocks and boost as much as possible, given there is enough power coming in and the temperatures are in check. Trust the AMD engineers in this case. In my case, my 5900x is easily able to go past 5GHz.
The golden trio – PBO2, Power Settings and Curve Optimizer
In order to achieve an actual “overclock” on Ryzen 5000, we’ll need to dive into three major components – PBO2, Curve Optimizer and Power Settings
Precision Boost Overdrive 2
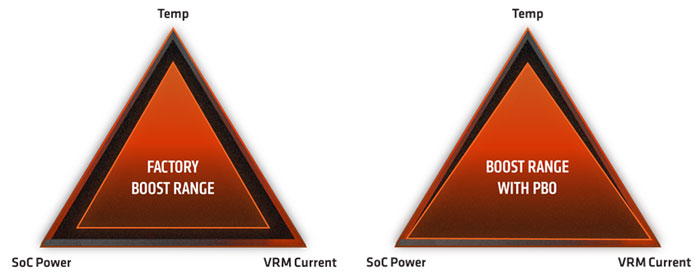
Precision Boost Overdrive (PBO for short) is when you extend the out of the box parameters that dictate performance on a Ryzen CPU – Temperature, SoC (chip) power and VRM Current (power delivery). PBO extends the maximum threshold for these components, allowing faster clock speeds to be achieved for a longer time. In short, this is AMD’s inbuilt overclocking capabilities baked into your CPU.
Power Settings
Here, I’m referring to the three major power settings – PPT, TDC and EDC. PPT is the total power that the CPU can intake. TDC is the amount of amperage the CPU is fed, under sustained load (thermally and electrically limited). EDC is the amount of amperage the CPU is fed, under short bursts (electrically limited). Allowing the CPU to take more power overall allows the CPU to boost to higher clock speeds. From the PBO triangle analogy, this positively impacts the left and right vertices – SoC power and VRM Current, while negatively impacting the top vertex – heat.
Curve Optimizer
Curve optimizer allows you to undervolt your CPU. Undervolting means that you’re pushing slightly less voltage, which consumes less power and generates less heat. This, combined with Precision Boost Overdrive 2 means that you’re pushing less heat, allowing the CPU to boost clock speeds. From the PBO triangle analogy, this mostly impacts the top vertex – heat.
Striking a balance with your settings and overclocking your Ryzen 5000
Now, that we’ve established our three main players, let’s tackle them one by one. To access these settings, you’ll need to access your BIOS – these settings are typically located in Advanced -> AMD Overclocking -> Precision Boost Overdive. Here’s a sample from my ASRock x570 Steel Legend.
After discussions with my readers, people seem to be suggesting different priorities when it comes to overclocking. I believe that a modest yet stable overclock can be achieved by prioritizing these:
- Scalar / Max CPU Override
- Power Settings
- Curve Optimizer
Some readers believe that the best priority is:
- Curve Optimizer
- Power Settings
- Scalar / Max CPU Override
If you are confused like me, pick the easiest and consider following this guide. Both will provide a nice performance gain and the differences you might see from one method to another may be in 1-2% more gain, which is negligible in real life.

Precision Boost Overdrive 2
This should be the easiest, let us just follow AMD’s recommendations. Looking at their slides here – AMD Precision Boost Overdrive 2 : Official Tech Briefing! – YouTube) we can start by looking at the setting that matter to turning on PBO.
- Precision Boost Overdrive – Advanced
- Allows us to turn on PBO and allows us to make manual adjustments to PBO settings
- PBO Scalar – 10X
- Should allow you sustain boost clocks for longer.
- Some readers debate whether this value should actually be 1x; I cannot verify this. These readers debate that setting it to 10x will raise your overall voltage. During my brief testing, I’ve observed that this is not the case, but this statement can (and might change) with more testing
- Max CPU Boost Clock Override – 200Mhz
- Raises your max frequency by 200Mhz. On a 5900x, this translates to a theoretical limit of 5150Mhz, which is realistic.
- I am told by my readers that setting a +200 boost on the Max CPU Boost Clock Override might negatively impact how much you’ll end up pushing on the Curve Optimizer. Unfortunately I’ve not neither the time or data to back up this fact.
- PURE SPECULATION / MY THOUGHTS AHEAD (No data to back up this claim whatsoever) -By reducing the Max CPU Boost Clock Override, you’ll of course be losing the highest single core boost clock speeds, **potentially** reducing single core performance, but you’ll be able to push more multi core score, or reaching the “lower” max single core performance more regularly. These will require extensive testing separately (and probably translate into margin of error when it comes to results).

Power Settings
In their slides (link above), AMD suggest using Power Limits = Motherboard. I strongly discourage this as it may limit your power intake (this was noticed both by me and readers in my blog – My Experience with Precision Boost Overdrive 2 on a 5900X – Albert Herd, comment by Julien Galland).
For my 5900X, these are the settings that I’ve applied. If you got a 5950X, 5900x 5800x, these values may (or may not) be suitable for you. If you got a 5800X or lower, these values are too high and will hinder performance. Applying lower settings to accommodate your CPU – apply a decent bump to the values quoted below by AMD. Unfortunately, I don’t own anything else apart from a 5900X so I cannot vouch for these settings for other models.
- If you got very good cooling (such a custom loop or strong cooling in general)
- PPT – 185W
- TDC – 125A
- EDC – 170A
- If your cooler will get too hot with these settings, try a more conservative setting. In my case, this setting hovers around 70-75C
- PPT – 165W
- TDC – 120A
- EDC – 150A
You might notice that your CPU might run too “cool” or too hot. In this case, adjust your figures accordingly. In a multi core benchmark, these figures should all hit a 100%. In most workloads, its the EDC that plays a role, not TDC (since most workloads are considered as short burst). I also noticed that going too low on EDC will cause instability.
Leave SOC TDC and SOC EDC to 0, these should not impact us (I believe this mostly applies for APUs).
For completeness sake, please keep in mind AMD’s default values when making adjustments to these values:
- Package Power Tracking (PPT): 142W 5950x, 5900x and 5800x and 88W for 5600x.
- Thermal Design Current (TDC): 95A 5950x, 5900x and 5800x and 60A for 5600x.
- Electrical Design Current (EDC): 140A 5950x, 5900x and 5800x and 90A for 5600x.

Curve optimizer
This is probably the most annoying one. The numbers you’re inputting here will vary significantly from one chip to another, so your mileage may vary. These are my values:
- Negative 11 for the first preferred cores on CCX 0 (as indicated by Ryzen Master)
- Negative 15 for the second preferred core on CCX 0 (as indicated by Ryzen Master)
- Negative 17 for the other cores.
If you want to start safe, you can apply a Negative 10 offset on all cores.


Testing this setting is extremely painful. You’ll notice that crashes will not happen under load; crashes will happen under idle conditions, where your CPU undervolts too much. Hopefully, AMD will look at this algorithm in future BIOS updates and provide more stability. In my experience, Geekbench 5 – Cross-Platform Benchmark is a great tool to stress my CPU out, it tends to crash it when the settings are not right.
Please keep in mind the note that I’ve written about the Max CPU Boost Override (under the header – Precision Boost Overdrive 2). Some users note that they prefer to keep Max CPU Boost Override lower and push for a more aggressive curve.
In my next post, we will look at how to get the best performance from your RAM, by applying specific DRAM configurations according to the RAM sticks you own. If you feel adventurous and feel like you can do it on your own:
- DRAM Calculator for Ryzen (v1.7.3) Download | TechPowerUp – download this application and dial in your settings
- Download Thaiphoon Burner 16.5.0.1 build 0101 Shareware / 16.3.4.0 Build 1005 Freeware (softpedia.com) – you’ll need this to identify the chip manufacturer of your RAM, which is required in DRAM calculator.
Thanks for reading!

Gonna try this on my 5900x! Great blog btw!
LikeLike
Thanks for guide gonna test it now
LikeLike
Thanks for your Guide, your first approach really helped me. I think max watt and amps in conjunktion with temps should be first priority.
My first trys, i setteld to:
PPT 170 TDC 115 EDC 165 AirCooling Dark Rock 4 Pro CPU
1.+2. -10 allcore -15 +200 boost 4990mhz peak 4441mhz allcore 83-86°C -> in Game: Hell let Loose 79-86°
cb_r23 22229
On a CB throttle loop (3min) the all core drops to 4310mhz, staying at >80°C pbo downclocks very hard
So i changed to
PPT 165 TDC 115 EDC 165
same PBO settings
nearly same same CB bench and clocks and a littlebit less heat on load, but still to much
Next change was to +100 Mhz Boost and agressiv undervolting (didnt managed it on +200mhz boost)
1.-10 + 2.-15 allcore -29 +100 boost 4948mhz(5040mhz) (random)peak 4416mhz allcore 81-84°C –> Hell let Loose 72-79°
cb_r23 22317 (in some test runs it goes up to 22400)
On a CB throttle loop (3min) allcore drops to 4392mhz
For me its seems on lower Boost level, the possiblity of further undervolting gains are better for more all core power, in exchange of higher clock speeds and hightemps.
LikeLike
I’d be interested to see what you get with some CTR 2.0 thrown into the mix. Particularly the diagnostics.
Combining a CTR hybrid profile of all core manual oc of 4.75 on ccx 1 and 4.65 on ccx 2 with a pbo of +100 gets me some different looking results.
CPUZ – 659 Sc, 10.1k Mc
CB20 – 623 Sc, 8972 Mc
CB23 – 1582 Sc, 22.8k Mc
Geekbench – 1694 Sc, 15.2k Mc
HWInfo shows PPT hitting 220w, TDC hitting 151A, and EDC pulling a whopping 280A. All limits set to Motherboard.
CPU temps in the low to mid 80’s under load with an NHd-14 (with the 8 year old stock fans), Highest reported vrm temp on the x570 tomahawk was 50, but seems to avg in the low-mid 40’s.
LikeLike
I haven’t tried CTR yet. I’ll be honest, I found stable settings on my configuration and I am happy with the performance that I’m getting. Since I need the system to be rock solid stable (since I work from home), I will not be exploring CTR. If I get another system, maybe. But for everyday usage, I’ll be sticking to my stable settings for the foreseeable future.
I think you’re pushing too much power and amperage, and you may be hindering your performance. Try setting manual figures with manual limits
LikeLike
CTR does unfortunately have its own issues, but it is still fun to play around with for multicore benching.
Every time I’ve attempted to use ppt/tdc/edc for power shaping performance went down somewhere without seeing gains anywhere else.
The best results I’ve gotten so far seem to come from letting it get as much power as it wants while the boost algorithm limits itself from thermals.
I have since changed around the voltage/CO to try and find some thermal efficiencies but no matter what I do I can’t seem to get an effective clock to go higher than 4.95 during a cb single core run.
LikeLike
Hi guys
Amd 5800x asus b550f
I messed up with pbo settings: curve -30
Pbt 185
Tdc 125
Edc 170
It was stabke with the same at -25 and pretty cool.
Now it doesnt boot.
Tried bios update and reset but red light is fixed.
May have damaged it?
I’m very worried…
LikeLike
I doubt you damaged it. Make sure to reset the BIOS correctly. Remove the motherboard battery, disconnect the power from main and press the power button a couple of times. After leaving it without the battery and mains for a couple of minutes, plug power back in and try again
LikeLike
Hi Albert, Thank you so much for your support. Unfortunately it didn’t work… i followed all your instructions, plus i tried again bios reset and i tried different versions of bios upgrade… chedked all the psu cables and are all plugged…. i really don’t know what to do now.
LikeLike
What is happening then? No POST? Do you manage to go in BIOS?
LikeLike
No, it does not boot, even to bios. Still red light
LikeLike
I’m guessing you’re referring to the red LED next to the 24-pin power cable, the CPU led? I suspect that the BIOS settings may have not been reset properly. There is a jumper on your motherboard, CLRTC.
Here’s a screenshot from your motherboard manual; note the CLRTC pin: https://imgur.com/a/C2aMEbM
Here’s a more detailed description: https://smallbusiness.chron.com/clear-cmos-asus-motherboard-53182.html
Basically, make sure both pins are touching with some screwdriver and boot it up, but the above link is more thorough
LikeLike
Hi Albert, thank you again for your patience. Yes i refer to the 24 pin power cable…. i tried the CLRTC many times… it seems impossible that i haven’t managed to reset, since i’ve done it other times… should i try to unplug all satas? other ideas? thanks
LikeLike
Hi. The situation sounds quite bad to be honest. I am not sure what to advise at this point; maybe try re-seating memory?
LikeLike
Right… Do u mean swapping modules and slots? Tomorrow i will try to swap cpu with my brother, let’s see if it is broken. I will come back and advise, just to make sure people take care with this settings…
Thanks
LikeLike
Hi Albert, i have news: i plugged in the second CPU power cable in the 4 pin power (8 pin was plugged also before) and no effect.
I left the PC connected the night with the PSU on. And surprise, this morning the MOBO did the process of checking all the components (lights) and post to BIOS…! So, i loaded optimized defaults (that was still there i believe but to be sure) and restarted.
After that all was the same: CPU red light fixed and no post. I tried also to change the electric connection to another wire…
all of this seems very strange and let me think to a CPU defect (there is no setting problem no for sure and the bios is default)…
I will continue to try and maybe try CPU swap.
LikeLike
hi I wanted to report my experience and sum up. The cpu I verified was ok, I’m using it right now, with good benchmarksH however the motherboard (ASUS B550-F Gaming) is dead. Trying to replace all the CPU components including the motherboard, she was no longer able to access the bios. It seems to me a manufacturing defect, since it was only a month old, however I wonder if the applied settings above could not have damaged it. Can you tell me what limits PPT-EDC etc has that motherboard, I can’t find them on google.
Thanks anyway for the support, I have now purchased a x570 which I will test.
LikeLike
Did you try to test stability with Prime95 small fft (like 4k-160k)? Could you share your results?
For me it’s an absolutely different story comparing to all other benches: even LinX keeps my CPU at comfortable temps below 80C. CiniBench behaves the same. But Prime95 immediately push it to the max temp configured in UEFI and drops max speed significantly. For my tests CiniBench / LinX forces 190W usage @ 4.55GHz all cores hitting 78C, but Prime requires 240W / 90C that maxes only @ 4.25GHz all cores (short test just to figure out the max power my cooler can handle)…
LikeLike
I already saw a couple youtubers testing curve optimizer vs Max single Core like +200 and in most cases they ended up at +0 or +50 for the Overall best Performance since you can input lower – numbers in curve optimizer which means less heat. It only benefits extreme Short burst scenarios (like under 3/4 secs). As soon as the CPU reaches it’s highest temp you lower your average boost on more than 1 Core.
LikeLike
Thanks for your post about PBO and voltage curve features on the Ryzen 9 5900x.
I tried the same setting as yours (lower PPT TDC EDC version) and it was rock stable !
I am also currently trying a global voltage curve with -15 and I get more boost frequency both single (5 GHz) and multithread (4,75 GHz). Geekbench scores now 14100-14600 in multi and 1675-1688 in single.
LikeLike
[…] Source: 🔗 […]
LikeLike
Hallo,
da würden mich mal Benchmark Ergebnisse vorher nachher interessieren, ich habe PBO auf Auto gestellt und läuft sehr stabil. Bin mir nicht sicher wieviel da manuell noch rauszuholen ist. Wenn das nur 1-2% sind ist es mir egal. Ohne PBO Cine23 Multi 10301 mit Auto PBO 11204 Punkte.
LikeLike
Hello,
I would be interested in benchmark results before and after, I have set PBO to Auto and it runs very stably. I’m not sure how much can be extracted manually. If it’s only 1-2% I don’t care. Without PBO Cine23 Multi 10301 with Auto PBO 11204 points.
LikeLike
Thank you for your blog. It was very informational. I have look over both of them. They have helped me a lot with understanding how it all works. Currently I am still messing with my settings. I’ll update soon.
LikeLike