Currently, I am working on a project that requires zipping and compressing files that exist on a storage account. Unfortunately, unless I am missing something, there is no out-of-the box way how to ZIP files on an Azure storage.
There are two major possibilities that I’ve found are:
Azure Data Factory – It’s a cloud based ETL storage solution. In my research, I found that this tool can cost quite a lot, since you’re paying for the rented machines and tasks. Data Factory – Data Integration Service | Microsoft Azure
Writing a bespoke solution – of course you’ve got the flexibility of doing whatever you want but it probably takes more time to develop, test and such.
Anyway, in my case I’ve decided to write my own application; there were other requirements that I needed to satisfy, which was it too complex for me to implement it in Azure Data Factory. I’ve written the following code (some code omitted for brevity)
CloudBlockBlob blob = targetStorageAccountContainer.GetBlockBlobReference("zipfile.zip");
blob.StreamWriteSizeInBytes = 104_857_600;

using (Stream dataLakeZipFile = await blob.OpenWriteAsync())
using (var zipStream = new ZipOutputStream(dataLakeZipFile))
{
    DataLakeDirectoryClient sourceDirectoryClient = dataLakeClient.GetDirectoryClient(sourceDataLakeAccount);
    await foreach(var blobItem in sourceDirectoryClient.GetPathsAsync(recursive: true, cancellationToken: cancellationToken))
    {
        zipStream.PutNextEntry(new ZipEntry(blobItem.Name));
        var httpResponseMessage = await _httpClient.GetAsync(GetFileToAddToZip(blobItem.Name), HttpCompletionOption.ResponseHeadersRead);
        using (Stream httpStream = await httpResponseMessage.Content.ReadAsStreamAsync())
        {
            await httpStream.CopyToAsync(zipStream);
        }

        zipStream.CloseEntry();
    }

    zipStream.Finish();
}
The following code does this following:
Create a reference to the ZIP file that is going to be created on the Storage Account. I also set StreamWriteSizeInBytes to 100MB; the largest. I never experimented with other figures. This refers to how much data to write per block.
Open a Stream object against the zip file. This overwrites any file with the same name.
Get all the files you need to ZIP. In my case, I am using the DataLake API because our files are on a Storage Account with hierarchical namespaces activated. This will work just as fine if your Storage Account doesn’t use hierarchical namspaces (you can just swap out and use the CloudBlobContainer API).
Open a new connection to the destination file and fetch it as a stream.
Copy the data received from the stream to the zip stream. This translates into HTTP requests, uploading it back to the Storage Account.
Close down all resources when its done.
Importantly, the code downloads files from the storage account and instantly uploads it back to the storage account as a ZIP. This does not store any data on physical disk and uses RAM to buffer the data as its downloaded and uploaded.
Of course, this part is just an excerpt of the whole system needed, but it can be adapted accordingly.
Please treat this guide as a beginner starting guide – you’ll need to spend a lot of time tweaking, especially on the curve optimizer.This is not an ultimate overclocking guide and some people might (and already did) not agree with the values and flow of this guide. Having said that, even if other approaches may be better, they will be slightly better, maybe 1-3% better, within margin of error. Following this guide WILL net you a performance gain; maybe not the BEST performance gain but a measurable one.
The following guide should work for the following CPUs:
Ryzen 9 5950x
Ryzen 9 5900x
Ryzen 7 5800x
Ryzen 5 5600x
The following should similarly work for Ryzen 3000 series, but you will not have access to the Curve Optimizer. Blame AMD for this.
Ryzen 5000 – Traditional overclocking is dead
Traditional overclocking involved going into the BIOS, typing a nice voltage and a reasonable clock speed and you are done. You can do it, and you will get a nice score in Cinebench, but you’ll lose everyday performance. Why?
By turning on a fixed max boost clock, you will be losing the higher boost clocks achieved when doing lightly threaded workloads (unless you manage to overclock to a fixed 5Ghz..if you do that, please write a guide for us!). These are the kind of workloads that you go through every day, which are the most important. If you set a max overclock of say 4.6 GHz, you won’t be able to go over 4.6 GHz in common tasks, which will slow them down.
Ryzen’s boost algorithm is smart
On the other hand, Ryzen’s boost algorithm is designed to go past the usual clocks and boost as much as possible, given there is enough power coming in and the temperatures are in check. Trust the AMD engineers in this case. In my case, my 5900x is easily able to go past 5GHz.
The golden trio – PBO2, Power Settings and Curve Optimizer
In order to achieve an actual “overclock” on Ryzen 5000, we’ll need to dive into three major components – PBO2, Curve Optimizer and Power Settings
Precision Boost Overdrive 2
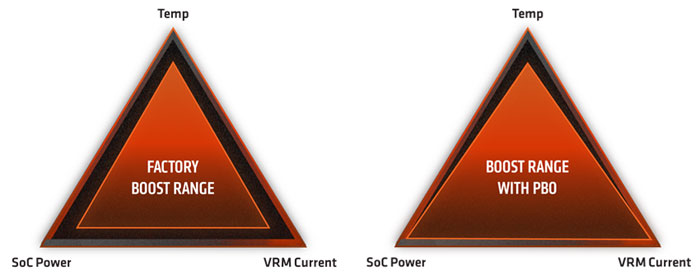
Precision Boost Overdrive (PBO for short) is when you extend the out of the box parameters that dictate performance on a Ryzen CPU – Temperature, SoC (chip) power and VRM Current (power delivery). PBO extends the maximum threshold for these components, allowing faster clock speeds to be achieved for a longer time. In short, this is AMD’s inbuilt overclocking capabilities baked into your CPU.
Here, I’m referring to the three major power settings – PPT, TDC and EDC. PPT is the total power that the CPU can intake. TDC is the amount of amperage the CPU is fed, under sustained load (thermally and electrically limited). EDC is the amount of amperage the CPU is fed, under short bursts (electrically limited). Allowing the CPU to take more power overall allows the CPU to boost to higher clock speeds. From the PBO triangle analogy, this positively impacts the left and right vertices – SoC power and VRM Current, while negatively impacting the top vertex – heat.
Curve Optimizer
Curve optimizer allows you to undervolt your CPU. Undervolting means that you’re pushing slightly less voltage, which consumes less power and generates less heat. This, combined with Precision Boost Overdrive 2 means that you’re pushing less heat, allowing the CPU to boost clock speeds. From the PBO triangle analogy, this mostly impacts the top vertex – heat.
Striking a balance with your settings and overclocking your Ryzen 5000
Now, that we’ve established our three main players, let’s tackle them one by one. To access these settings, you’ll need to access your BIOS – these settings are typically located in Advanced -> AMD Overclocking -> Precision Boost Overdive. Here’s a sample from my ASRock x570 Steel Legend.
After discussions with my readers, people seem to be suggesting different priorities when it comes to overclocking. I believe that a modest yet stable overclock can be achieved by prioritizing these:
Scalar / Max CPU Override
Power Settings
Curve Optimizer
Some readers believe that the best priority is:
Curve Optimizer
Power Settings
Scalar / Max CPU Override
If you are confused like me, pick the easiest and consider following this guide. Both will provide a nice performance gain and the differences you might see from one method to another may be in 1-2% more gain, which is negligible in real life.
Allows us to turn on PBO and allows us to make manual adjustments to PBO settings
PBO Scalar – 10X
Should allow you sustain boost clocks for longer.
Some readers debate whether this value should actually be 1x; I cannot verify this. These readers debate that setting it to 10x will raise your overall voltage. During my brief testing, I’ve observed that this is not the case, but this statement can (and might change) with more testing
Max CPU Boost Clock Override – 200Mhz
Raises your max frequency by 200Mhz. On a 5900x, this translates to a theoretical limit of 5150Mhz, which is realistic.
I am told by my readers that setting a +200 boost on the Max CPU Boost Clock Override might negatively impact how much you’ll end up pushing on the Curve Optimizer. Unfortunately I’ve not neither the time or data to back up this fact.
PURE SPECULATION / MY THOUGHTS AHEAD (No data to back up this claim whatsoever) -By reducing the Max CPU Boost Clock Override, you’ll of course be losing the highest single core boost clock speeds, **potentially** reducing single core performance, but you’ll be able to push more multi core score, or reaching the “lower” max single core performance more regularly. These will require extensive testing separately (and probably translate into margin of error when it comes to results).
Power Settings
In their slides (link above), AMD suggest using Power Limits = Motherboard. I strongly discourage this as it may limit your power intake (this was noticed both by me and readers in my blog – My Experience with Precision Boost Overdrive 2 on a 5900X – Albert Herd, comment by Julien Galland).
For my 5900X, these are the settings that I’ve applied. If you got a 5950X, 5900x 5800x, these values may (or may not) be suitable for you. If you got a 5800X or lower, these values are too high and will hinder performance. Applying lower settings to accommodate your CPU – apply a decent bump to the values quoted below by AMD. Unfortunately, I don’t own anything else apart from a 5900X so I cannot vouch for these settings for other models.
If you got very good cooling (such a custom loop or strong cooling in general)
PPT – 185W
TDC – 125A
EDC – 170A
If your cooler will get too hot with these settings, try a more conservative setting. In my case, this setting hovers around 70-75C
PPT – 165W
TDC – 120A
EDC – 150A
You might notice that your CPU might run too “cool” or too hot. In this case, adjust your figures accordingly. In a multi core benchmark, these figures should all hit a 100%. In most workloads, its the EDC that plays a role, not TDC (since most workloads are considered as short burst). I also noticed that going too low on EDC will cause instability.
Leave SOC TDC and SOC EDC to 0, these should not impact us (I believe this mostly applies for APUs).
For completeness sake, please keep in mind AMD’s default values when making adjustments to these values:
Package Power Tracking (PPT): 142W 5950x, 5900x and 5800x and 88W for 5600x.
Thermal Design Current (TDC): 95A 5950x, 5900x and 5800x and 60A for 5600x.
Electrical Design Current (EDC): 140A 5950x, 5900x and 5800x and 90A for 5600x.
Curve optimizer
This is probably the most annoying one. The numbers you’re inputting here will vary significantly from one chip to another, so your mileage may vary. These are my values:
Negative 11 for the first preferred cores on CCX 0 (as indicated by Ryzen Master)
Negative 15 for the second preferred core on CCX 0 (as indicated by Ryzen Master)
Negative 17 for the other cores.
If you want to start safe, you can apply a Negative 10 offset on all cores.
Testing this setting is extremely painful. You’ll notice that crashes will not happen under load; crashes will happen under idle conditions, where your CPU undervolts too much. Hopefully, AMD will look at this algorithm in future BIOS updates and provide more stability. In my experience, Geekbench 5 – Cross-Platform Benchmark is a great tool to stress my CPU out, it tends to crash it when the settings are not right.
Please keep in mind the note that I’ve written about the Max CPU Boost Override (under the header – Precision Boost Overdrive 2). Some users note that they prefer to keep Max CPU Boost Override lower and push for a more aggressive curve.
In my next post, we will look at how to get the best performance from your RAM, by applying specific DRAM configurations according to the RAM sticks you own. If you feel adventurous and feel like you can do it on your own:
In this series of posts, we’re investigating micro-optimizations in C#. As previously mentioned, these may not be applicable to all; but it’s still fun looking at these concepts.
Passing structs by ref brings a major disadvantage – the callee might mutate the value of the struct without the caller ever knowing. What if we need to pass structs in an efficient manner, whilst having peace of mind that the callee doesn’t mutate the struct?
Meet the in parameter modifier- C# 7.2
What does the in parameter modifier do? It allows us to pass the argument by reference and giving us the guarantee that the arguments cannot be modified by the callee. Excellent! Let’s run a quick test and make sure our performance is still comparable when passing by ref. Let’s have a struct with 2 properties – let’s have some work done using two different methods – passing by ref and passing by in.
public class SixteenBitStructBenchmark
{
    [Benchmark]
    [Arguments(100000000)]
    public void BenchmarkIncrementByRef(int limit)
    {
        SixteenBitStruct sixteenBitStruct = new SixteenBitStruct();
        int counter = 0;
        do
        {
            IncrementByRef(ref sixteenBitStruct);
            counter++;
        }
        while (limit != counter);
    }

    [Benchmark]
    [Arguments(100000000)]
    public void BenchmarkIncrementByIn(int limit)
    {
        SixteenBitStruct sixteenBitStruct = new SixteenBitStruct();
        int counter = 0;
        do
        {
            IncrementIn(sixteenBitStruct);
            counter++;
        }
        while (limit != counter);
    }

    private void IncrementByRef(ref SixteenBitStruct sixteenBitStruct)
    {
        double sum = sixteenBitStruct.D1 + sixteenBitStruct.D2;
    }

    private void IncrementIn(in SixteenBitStruct sixteenBitStruct)
    {
        double sum2 = sixteenBitStruct.D1 + sixteenBitStruct.D2;
    }
}

public struct SixteenBitStruct
{
    public double D1 { get; }
    public double D2 { get; }
}
Let’s see how they perform.
Method
limit
Mean
Error
StdDev
BenchmarkIncrementByRef
100000000
23.83 ms
0.0272 ms
0.0241 ms
BenchmarkIncrementByIn
100000000
238.21 ms
0.3108 ms
0.2755 ms
Performance loss?
Wait a second – why is IncrementByIn 10x slower than IncrementByRef when we’re accessing 2 properties in the same struct? Let’s have a look at the generated IL.
IncrementByRef
 IL_0000: ldarg.1
IL_0001: call instance float64 InOperator.SixteenBitStruct::get_D1()
# Loads argument 1 (SixteenBitStruct) and call the getter
IncrementByIn
 IL_0000: ldarg.1
# Prepare a new local variable on the evaluation stack
IL_0001: ldobj InOperator.SixteenBitStruct
# Copies the value of SixteenBitStruct into the loaed argument variable
IL_0006: stloc.0
IL_0007: ldloca.s V_0
IL_0009: call instance float64 InOperator.SixteenBitStruct::get_D1()
# Pops the newly created argument into location 0, loads local variable 0 (new copy of SixteenBitStruct) and call the getter
Interesting! When we’ve called the method by ref, the resultant IL just loads the argument and calls the getter. When we’ve called the method by in, the resultant IL creates a copy of the struct before the getter is called. It seems that each time we’re referencing the property, C# is generating a copy of the object for us? We’re facing a by-design feature – a defensive copy.
Why do we encounter a defensive copy?
When calling the getter of our properties, the compiler doesn’t know if the getter mutates the object. Although this is a getter, it’s only by convention that changes aren’t made; there is no language construct that prevents us from changing values in our getter. The compiler must honor the in keyword and generate a defensive copy, just in case the getter modifies the struct.
In the end of the day, a getter is just syntactic sugar for a method. Of course, defensive copies will be generated if methods are called on the struct since the compiles can’t provide any guarantee that the method call won’t mutate the struct.
How do we get around this?
We’ll need instruct the compiler that our struct is immutable, so the compiler doesn’t need to worry about creating defensive copies since values cannot change. C# provides this exact functionality in fact! We can slap the “readonly” keyword (and drop any setters) so that we can guarantee that our struct is now immutable.
Here’s how it looks now
 public readonly struct SixteenBitStruct
{
    public double D1 { get; }
    public double D2 { get; }
}
Revisiting our performance numbers
Let’s re-run our benchmarks and assess the performance.
Method
limit
Mean
Error
StdDev
BenchmarkIncrementByRef
100000000
23.93 ms
0.1226 ms
0.1147 ms
BenchmarkIncrementByIn
100000000
24.06 ms
0.2183 ms
0.2042 ms
Far better! Performance is now equal (within margin of error). Some closing thoughts about this:
Using the in operator is an excellent feature – it allows the callers to safely assume that the values they are going to pass will not have their values changed.
Using the readonly modifier with a struct is another excellent feature – it allows the the developer to safely say that its value is immutable and no changes are allowed.
The performance uplift is should be considered as a bonus – the design and infrastructure wins using the in / readonly keywords in these context carry far more value.
Don’t ever use the in keyword in conjunction with non-readonly structs. Chances are that the performance gained from passing by ref will be lost by accessing the struct’s properties and methods.
In this series of posts, we’ll be investigating key areas for micro-optimizations. As the title implies, these are micro-optimizations and may not be applicable for you unless you are writing some high-performance library of have a piece of code running in a tight loop. Nonetheless, it’s still fun to investigate and find these micro-optimizations. Onwards!
Let’s start with a simple one – the ref keyword in method arguments. For this argument, we’re only concerned with value type method arguments – structs.
Since structs are value types, by default, the entire struct is copied over to the callee, irrelevant of the size of the struct. If the struct is big, this is typically a bottleneck since a copy must be created and passed for each call. C# provides a method of overriding this behavior by using the ref keyword. If an argument is marked as ref, a pointer to the struct will be passed rather than an actual copy!
This brings two major advantages:
If the struct is bigger than 4 bytes (on a 32 bit machine) or 8 bytes (on a 64 bit machine), passing a struct by ref means that less data copying is taking place.
We avoid copying back the data – we do not need to return the data since a reference is passed rather than a copy of the struct.
Let’s see an example – lets consider a struct containing two doubles – a 16 byte struct. Let’s say we have two methods that increments one of the values for us (just to give the loop something to do and not get it optimised away).
One of them accepts a (copy of a) struct, increments its internal values and returns the copy back. This is passed by value, which is the default behavior for a struct.
The other method accepts a struct by ref and increments its internal values. There is no need to return the data back therefore no extra copies were needed. This is not the default behavior, so we’ll need to accompany it with the ref keyword.
[CoreJob]
public class SixteenBytesStructBenchmark
{
    [Benchmark]
    [Arguments(1000000)]
    public void BenchmarkIncrementByRef(int limit)
    {
        SixteenBytesStruct value = new SixteenBytesStruct();
        int counter = 0;
        do
        {
            IncrementByRef(ref value);
            counter++;
        }
        while (limit != counter);
    }
    [Benchmark]
    [Arguments(1000000)]
    public void BenchmarkIncrementByVal(int limit)
    {
        SixteenBytesStruct value = new SixteenBytesStruct();
        int counter = 0;
        do
        {
            value = IncrementByVal(value);
            counter++;
        }
        while (limit != counter);
    }
    private void IncrementByRef(ref SixteenBytesStruct toIncrement)
    {
        toIncrement.d0++;
    }
    private SixteenBytesStruct IncrementByVal(SixteenBytesStruct toIncrement)
    {
        toIncrement.d0++;
        return toIncrement;
    }
}
public struct SixteenBytesStruct
{
    public long d0, d1;
}
The below is the time taken for 1000000 runs – this was executed using .NET core 2.2.1 – benchmarks done using BenchmarkDotNet
Method
limit
Mean
Error
StdDev
BenchmarkIncrementByRef
1000000
1.663 ms
0.0139 ms
0.0130 ms
BenchmarkIncrementByVal
1000000
2.872 ms
0.0155 ms
0.0145 ms
We can see that running this in a tight loop, doing the work by ref, in this case, is 72% faster! To what can we attribute this performance change? Let’s have a look at what’s happening behind the scenes.
Doing the work by value
Calling IncrementByVal
IL_000a: ldarg.0 # Load the “this” parameter on evaluation stack (implicit)
IL_000b: ldloc.0 # Load SixteenBytesStruct value on the stack (16 bytes worth of data) from location 0
IL_000c: call instance valuetype Ref.SixteenBytesStruct Ref.SixteenBytesStructBenchmark::IncrementByVal(valuetype Ref.SixteenBytesStruct) # Call IncrementByVal with the loaded arguments
IL_0011: stloc.0 #Captures the returned value and stores it in location 0
IncrementByVal Implementation
IL_0000: ldarga.s toIncrement # Load the argument’s address so processing can begin
..method work – removed for brevity
IL_001a: ldarg.1 # Load the value of the field back so it can be returned
IL_001b: ret
What’s happening here?
Push the value of SixteenBytesStruct ready to be captured by the upcoming method call
Call IncrementByVal
IncrementByVal loads the address of the received value from the caller and does the required work
Push the value of the SixteenByteStruct after the work has been done ready to be captured by the caller
IncrementByVal Returns
Pop the value from replace the value of SixteenBytesStruct with the new one
Doing the work by ref
Calling IncrementByRef
IL_000a: ldarg.0 # Load the “this” parameter on evaluation stack (implicit)
IL_000b: ldloca.s V_0 # Load SixteenBytesStruct’s address on the stack (8 bytes worth of data)
IL_000d: call instance void Ref.SixteenBytesStructBenchmark::IncrementByRef(valuetype Ref.SixteenBytesStructamp;) # Call IncrementByVal with the loaded arguments
IncrementByVal Implementation
IL_0000: ldarg.1 # Load the argument so processing can begin. We’re not calling ldarga.s since this already the struct’s address rather than the actual value
..method work – removed for brevity
IL_0018: ret # Return
What’s happening here?
Push the address of SixteenBytesStruct ready to be captured by the upcoming method call
Call IncrementByVal
IncrementByVal gets value received from the caller (the value is an address) and does the required work
IncrementByVal Returns
What does this mean?
One can obviously note that doing the work by ref has significantly less work to do:
The callee is pushing 8 bytes instead of 16 bytes
The callee loads 8 bytes onto the evaluation stack instead of 16 bytes
The callee doesn’t need to push the new value onto the evaluation stack
The callee doesn’t need to pop the stack and stored the updated value
Therefore, doing the work by ref is pushing less data when a method call takes place (maximum of 8 bytes, irrespective of the struct size) and is avoiding two data copy instructions, since it does not need to push and pop the new value since there are no return values.
If you increase the size of the struct, the performance gains would be even bigger, as shown in the below graph.
We can observe some useful information from this graph
When it comes to doing operations by ref, performance is basically equivalent all cross the board, irrelevant to the size of the struct.
16 byte, 8 byte and 4 byte structs carry identical performance – they are just separated by the margin of error.
16 byte, 8 byte and 4 byte structs are faster than 2 byte and 1 byte structs. In fact, 1 byte struct ends up clearly slower than a 2 byte struct! It’s very interesting to explore why 1 and 2 byte structs exhibit performance degradation.
The rest of the result show a consistent upward trend – which reflect the amount of data copying take place.
What’s very interesting is that a 4 byte integer operates faster by value when compared to 1 byte and 2 byte integers!