Why a three node Zookeeper cluster is probably not a great idea

Just to get this out of the way, you might find conflicting information on the internet saying that now, Kafka doesn’t require a Zookeeper installation, referred to as KRaft. As of time of writing, KRaft was just marked production ready just a month ago. At this point I still think that it might be a bit too early to adopt, especially given that tools to support KRaft may be immature. Confluent still marks KRaft as early access. So, let’s focus on a Kafka with Zookeeper.

What is Zookeeper? It is a tool which end products may use; on its own it doesn’t really do much. If your product requires distributed coordination while being highly reliable, then Zookeeper is a great product. In fact, therefore Kafka uses it. Kafka uses Zookeeper to hold multiple data structures, such as:

  • The alive brokers
  • Topic Configuration
  • In-Sync Replicas
  • Topic Assignments
  • Quotas

Truth be told, you should not be super concerned on how they work in the background; this is just information that Kafka stores to remain functional. The main takeaway is that these are all decisions that need to be co-ordinated across a cluster, which Zookeeper does on behalf of Kafka.

So, let’s dive into why I’m writing the article in the first place. Production-worthy Zookeeper should not be a single node; it should be a cluster of nodes, referred to as an Ensemble. For an Ensemble to be healthy, it requires the majority (over 50%) of the servers to be online and communicating with each other. The majority is also referred to as a Quorum. Refer to this guide for more information – https://zookeeper.apache.org/doc/r3.4.10/zookeeperAdmin.html

Online, you’ll find this magic formula – 2xF + 1. The F in this case refers to how many servers you tolerate to have offline to remain functional.

If, for example, you don’t tolerate any servers to be offline to remain functional, 2×0 + 1 = 1 – you only need one server. But this means you can never ever afford a failure, which isn’t good. So, we’re not going to even consider that.

3 Server Ensemble

Let’s try it with tolerating one offline server – 2×1 + 1 = 3. Therefore, the Ensemble size should be 3 servers, to allow one failure. In fact, this is what you’ll find online – a minimum of three servers. At face value, it might look OK, but I believe it’s just a ticking timebomb.

When everything is healthy, the ensemble will look like the below.

When a node goes down, the ensemble will look like the below. It will still function, but cannot tolerate any more losses.

If a network split happens, or another node goes offline, a Quorum cannot be formed, hence it goes offline and intervention is needed.

You might say, tolerating one failure sounds GREAT. But, I’d say is far more than enough. Let’s face it, servers will need to be patched and this happens often. What happens if patching fails (or takes an awfully long time), and other server happens to suffer from some failure? You may say that this is highly unlikely to happen, but recently I just witnessed a server that took almost a day to be patched, fixed and brought back online. If, during that time, a blip happened in the network, the two servers would disconnect and would never manage to come back online, because of the Split Brain problem – https://en.wikipedia.org/wiki/Split-brain_(computing)

In my opinion, there will be times where you will operate with one node down, whether it would be patching or the bare metal suffers some problem, therefore 3 nodes aren’t enough.

5 Server Ensemble

Here’s what I think is a TRUE minimum – allowing 2 nodes to fail before going offline. To allow for two nodes, using the previous formula: 2×2 + 1 = 5. Therefore, the Ensemble size should be 5 servers, to allow for two failures.

When everything is healthy, the ensemble will look like the below.

When a node goes down, the ensemble will look like the below. It will still function and we can tolerate another loss.

When another node goes down, the ensemble will look like the below. It will still function, but cannot tolerate any more losses.

With 3 nodes down, less than 50% of the nodes are available, hence a Quorum cannot be formed.

You can also get taken offline with an offline node and a split network.

With a 5 server ensemble, if you are doing maintenance on a particular node, you still afford to lose another node before the ensemble is taken offline. Of course, this still suffers from the split brain problem, where if your 5 server ensemble suffers an offline node and gets a network split, directly in the middle. You’d end up with 2 nodes on each split and unable to serve any requests. Great care will need to be taken on which part of a data centre the servers are provisioned on.

This scaling can continue going upwards e.g. 7 node cluster. Of course at that point, you’ll need to factor in the higher latency that it brings (because more nodes will need to acknowledge messages) and the overall maintenance required. I’ve also omitted discussing the correct placement of availability zones for each server node. Great care must also be taken when doing so.

Until the next one!

My problems with Bitwarden’s lax security measures

Imagine this – you got all your secrets stashed in a box, that requires a key. This box is sitting in a very public place, say your city’s park. Also, a LOT of copies of the keys lie hidden away, somewhere – if you really know how to look, they’re there. You’re just trusting that people don’t know how to look for these keys, and it helps you sleep soundly at night.This, well, the above, is Bitwarden. What’s Bitwarden? Bitwarden is probably the most commonly used Password Manager, after LastPass decided to slash the free tier. Bitwarden stores all your secrets, all username, passwords, maybe some secure notes, some credit card details. All of your digital life is there.

Here’s the problem though, the key to access all this data might already exist on the internet. Actually, scratch that, it PROBABLY does exist on the internet! Can you verify this? Yes, but you have to pay unfortunately. So, now, there is a price tag against your online security. What do I mean? Bitwarden does offer some kind of audit, like LastPass did. But this is locked for premium users only, listed under Vault Health Reports. Actually, I have no idea whether they check your username and master password – and I don’t want to compromise my account to verify whether this exists.

On the same subject, I bet that most of the users who use Bitwarden re-use passwords for their Master Password, probably passwords that got compromised in the past and tempted them to start using Bitwarden in the first place? Am I speaking from experience? I’ll let you answer that one yourself. There is no need to try it on my account though, promise!

Also, it gets worse. If your details do INDEED exist and someone compromises them, you’re done. By default (or, at least for me) – 2FA is not turned on by default. So if someone does get hold of your details – you’re toast. Why isn’t 2FA enforced by default? My McDonalds app requires 2FA in order for my (initial) login to get some free fries! Why doesn’t my literal secret chest enforce 2FA? Not to mention, that I don’t really like the 2FA that is offered with the free version – for this kind of 2FA I prefer SMS – but that’s just my opinion.

Sorry – but another thing. I think that having your username as your email is quite silly as well. I’d prefer to pick a username which might be arbitrary and exist only in Bitwarden’s universe. But by having the email as the username prevents me from doing so. That means, by simply signing up to the services, my account is automatically searchable against billions of compromised passwords, such as https://haveibeenpwned.com/. I’d prefer if the username was some actual free-text field. Gmail users MIGHT be able to get away task-specific emails.

Here’s a take-away of all my woes:

  • The free account does not come strong auditing capabilities, such as re-used passwords.
  • Master passwords probably use reused passwords
  • 2FA is not on by default
  • Username must be your email address

Of course, I understand that Bitwarden, as a company, is there to make money at the end of the day, but I feel that profits are coming in at the expense of giving people a proper secure platform to trust literally all their online (and offline) secrets, which is a bit of a shame! In all fairness, the subscription for a year is very low at only $10 which solves the auditing issue and better 2FA capabilities.

Fortunately, this is all hypothetically, but this kept me up all night, literally. Onto the next one!

Get Files in ZIP file stored on Azure without downloading it

Recently, I was working on a task where we had to get file entries and names off ZIP files stored on Azure. We had terabytes of data to go through and downloading them was not really an option. In the end of the day, we solved this in a totally different way, but I remained curious if this is possible, and it sure is.

The aim is to get all the entry names of ZIP files stored on an Azure Storage Account. Unfortunately, using our beloved HttpClient isn’t possible (or at least, I didn’t research enough). The reason is that although HttpClient does allow us to access an HttpRequest as a Stream, the Stream itself isn’t seekable (CanSeek: false).

This is why we need to use the Azure.Storage.Blobs API – this allows us to get a Seekable Stream against a File stored in Azure Storage Account. What this means is that we can download specific parts of the ZIP file where the names are stored, rather than the data itself. Here is a detailed diagram on how ZIP files are stored, though this is not needed as the libraries will handle all the heavy lifting for us – The structure of a PKZip file (jmu.edu)

We will also be using the out-of-the-box ZipArchive library. This will allow us to open a Zip File from a Stream. This library is also smart enough to know that if a stream is Seekable, it will seek to the part where the File Names are being stored rather than downloading the whole file.

Therefore, all we need is to open a stream to the ZIP using the Azure.Storage.Blobs, pass it to the ZipArchive library and read the entries out of it. This process ends up essentially almost instant, even for large ZIP files.

using Azure.Storage;
using Azure.Storage.Blobs;
using System;
using System.IO.Compression;
using System.Linq;
using System.Threading.Tasks;
namespace GetZipFileNamesFromAzureZip
{
class Program
{
private const string StorageAccountName = "xxxxxx";
private const string StorageAccountKey = "xxxxxxxxxxxxxxx";
private const string ContainerName = "xxxxxxxxxx";
private const string FileName = "file.zip";
private const string Url = "https://" + StorageAccountName + ".blob.core.windows.net";
static async Task Main(string[] args)
{
BlobServiceClient client = new BlobServiceClient(new Uri(Url), new StorageSharedKeyCredential(StorageAccountName, StorageAccountKey));
var container = client.GetBlobContainerClient(ContainerName);
var blobClient = container.GetBlobClient(FileName);
var stream = await blobClient.OpenReadAsync();
using ZipArchive package = new ZipArchive(stream, ZipArchiveMode.Read);
Console.WriteLine(string.Join(",", package.Entries.Select(x => x.FullName).ToArray()));
}
}
}

Until the next one!

Compressing files on an Azure Storage Account fast and efficiently.

Currently, I am working on a project that requires zipping and compressing files that exist on a storage account. Unfortunately, unless I am missing something, there is no out-of-the box way how to ZIP files on an Azure storage.

There are two major possibilities that I’ve found are:

  • Azure Data Factory – It’s a cloud based ETL storage solution. In my research, I found that this tool can cost quite a lot, since you’re paying for the rented machines and tasks. Data Factory – Data Integration Service | Microsoft Azure
  • Writing a bespoke solution – of course you’ve got the flexibility of doing whatever you want but it probably takes more time to develop, test and such.

Anyway, in my case I’ve decided to write my own application; there were other requirements that I needed to satisfy, which was it too complex for me to implement it in Azure Data Factory. I’ve written the following code (some code omitted for brevity)


CloudBlockBlob blob = targetStorageAccountContainer.GetBlockBlobReference("zipfile.zip");
blob.StreamWriteSizeInBytes = 104_857_600;      

using (Stream dataLakeZipFile = await blob.OpenWriteAsync())
using (var zipStream = new ZipOutputStream(dataLakeZipFile))
{
    DataLakeDirectoryClient sourceDirectoryClient = dataLakeClient.GetDirectoryClient(sourceDataLakeAccount);
    await foreach(var blobItem in sourceDirectoryClient.GetPathsAsync(recursive: true, cancellationToken: cancellationToken))   
    {
        zipStream.PutNextEntry(new ZipEntry(blobItem.Name));
        var httpResponseMessage = await _httpClient.GetAsync(GetFileToAddToZip(blobItem.Name), HttpCompletionOption.ResponseHeadersRead);
        using (Stream httpStream = await httpResponseMessage.Content.ReadAsStreamAsync())
        {
            await httpStream.CopyToAsync(zipStream);
        }

        zipStream.CloseEntry();
    }

    zipStream.Finish();
}  

The following code does this following:

  • Create a reference to the ZIP file that is going to be created on the Storage Account. I also set StreamWriteSizeInBytes to 100MB; the largest. I never experimented with other figures. This refers to how much data to write per block.
  • Open a Stream object against the zip file. This overwrites any file with the same name.
  • Get all the files you need to ZIP. In my case, I am using the DataLake API because our files are on a Storage Account with hierarchical namespaces activated. This will work just as fine if your Storage Account doesn’t use hierarchical namspaces (you can just swap out and use the CloudBlobContainer API).
  • Open a new connection to the destination file and fetch it as a stream.
  • Copy the data received from the stream to the zip stream. This translates into HTTP requests, uploading it back to the Storage Account.
  • Close down all resources when its done.

Importantly, the code downloads files from the storage account and instantly uploads it back to the storage account as a ZIP. This does not store any data on physical disk and uses RAM to buffer the data as its downloaded and uploaded.

Of course, this part is just an excerpt of the whole system needed, but it can be adapted accordingly.

Until the next one!

Overclocking your Zen 3 / Ryzen 5000 with Precision Boost Overdrive 2 and Curve Optimizer

Ever since I have written my experience using Precision Boost Overdrive 2 and Curve optimizer in my last blog post, I have been asked several questions on how to overclock your Ryzen 5000 CPU. Let’s discuss the basics for overclocking on Ryzen 5000.

Please treat this guide as a beginner starting guide – you’ll need to spend a lot of time tweaking, especially on the curve optimizer. This is not an ultimate overclocking guide and some people might (and already did) not agree with the values and flow of this guide. Having said that, even if other approaches may be better, they will be slightly better, maybe 1-3% better, within margin of error. Following this guide WILL net you a performance gain; maybe not the BEST performance gain but a measurable one.

The following guide should work for the following CPUs:

  • Ryzen 9 5950x
  • Ryzen 9 5900x
  • Ryzen 7 5800x
  • Ryzen 5 5600x

The following should similarly work for Ryzen 3000 series, but you will not have access to the Curve Optimizer. Blame AMD for this.

Ryzen 5000 – Traditional overclocking is dead

Traditional overclocking involved going into the BIOS, typing a nice voltage and a reasonable clock speed and you are done. You can do it, and you will get a nice score in Cinebench, but you’ll lose everyday performance. Why?

By turning on a fixed max boost clock, you will be losing the higher boost clocks achieved when doing lightly threaded workloads (unless you manage to overclock to a fixed 5Ghz..if you do that, please write a guide for us!). These are the kind of workloads that you go through every day, which are the most important.  If you set a max overclock of say 4.6 GHz, you won’t be able to go over 4.6 GHz in common tasks, which will slow them down.

Ryzen’s boost algorithm is smart

On the other hand, Ryzen’s boost algorithm is designed to go past the usual clocks and boost as much as possible, given there is enough power coming in and the temperatures are in check. Trust the AMD engineers in this case. In my case, my 5900x is easily able to go past 5GHz.

The golden trio – PBO2, Power Settings and Curve Optimizer

In order to achieve an actual “overclock” on Ryzen 5000, we’ll need to dive into three major components – PBO2, Curve Optimizer and Power Settings

Precision Boost Overdrive 2

Precision Boost Overdrive (PBO for short) is when you extend the out of the box parameters that dictate performance on a Ryzen CPU – Temperature, SoC (chip) power and VRM Current (power delivery). PBO extends the maximum threshold for these components, allowing faster clock speeds to be achieved for a longer time. In short, this is AMD’s inbuilt overclocking capabilities baked into your CPU.

PBO Triangle – via https://hwcooling.net

Power Settings

Here, I’m referring to the three major power settings – PPT, TDC and EDC. PPT is the total power that the CPU can intake. TDC is the amount of amperage the CPU is fed, under sustained load (thermally and electrically limited). EDC is the amount of amperage the CPU is fed, under short bursts (electrically limited). Allowing the CPU to take more power overall allows the CPU to boost to higher clock speeds. From the PBO triangle analogy, this positively impacts the left and right vertices – SoC power and VRM Current, while negatively impacting the top vertex – heat.

Curve Optimizer

Curve optimizer allows you to undervolt your CPU. Undervolting means that you’re pushing slightly less voltage, which consumes less power and generates less heat. This, combined with Precision Boost Overdrive 2 means that you’re pushing less heat, allowing the CPU to boost clock speeds. From the PBO triangle analogy, this mostly impacts the top vertex – heat.

Striking a balance with your settings and overclocking your Ryzen 5000

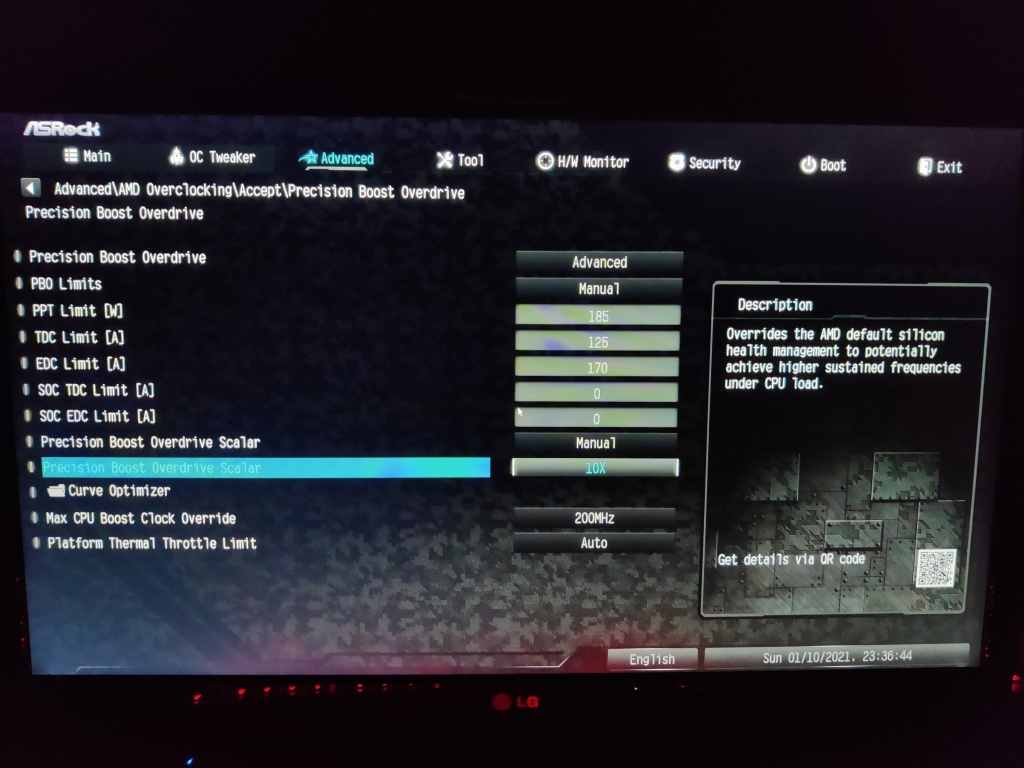
Now, that we’ve established our three main players, let’s tackle them one by one. To access these settings, you’ll need to access your BIOS – these settings are typically located in Advanced -> AMD Overclocking -> Precision Boost Overdive. Here’s a sample from my ASRock x570 Steel Legend.

After discussions with my readers, people seem to be suggesting different priorities when it comes to overclocking. I believe that a modest yet stable overclock can be achieved by prioritizing these:

  1. Scalar / Max CPU Override
  2. Power Settings
  3. Curve Optimizer

Some readers believe that the best priority is:

  1. Curve Optimizer
  2. Power Settings
  3. Scalar / Max CPU Override

If you are confused like me, pick the easiest and consider following this guide. Both will provide a nice performance gain and the differences you might see from one method to another may be in 1-2% more gain, which is negligible in real life.

Precision Boost Overdrive 2

This should be the easiest, let us just follow AMD’s recommendations. Looking at their slides here –  AMD Precision Boost Overdrive 2 : Official Tech Briefing! – YouTube) we can start by looking at the setting that matter to turning on PBO.

  • Precision Boost Overdrive – Advanced
    • Allows us to turn on PBO and allows us to make manual adjustments to PBO settings
  • PBO Scalar – 10X
    • Should allow you sustain boost clocks for longer.
    • Some readers debate whether this value should actually be 1x; I cannot verify this. These readers debate that setting it to 10x will raise your overall voltage. During my brief testing, I’ve observed that this is not the case, but this statement can (and might change) with more testing
  • Max CPU Boost Clock Override – 200Mhz
    • Raises your max frequency by 200Mhz. On a 5900x, this translates to a theoretical limit of 5150Mhz, which is realistic.
    • I am told by my readers that setting a +200 boost on the Max CPU Boost Clock Override might negatively impact how much you’ll end up pushing on the Curve Optimizer. Unfortunately I’ve not neither the time or data to back up this fact.
    • PURE SPECULATION / MY THOUGHTS AHEAD (No data to back up this claim whatsoever) -By reducing the Max CPU Boost Clock Override, you’ll of course be losing the highest single core boost clock speeds, **potentially** reducing single core performance, but you’ll be able to push more multi core score, or reaching the “lower” max single core performance more regularly. These will require extensive testing separately (and probably translate into margin of error when it comes to results).

Power Settings

In their slides (link above), AMD suggest using Power Limits = Motherboard. I strongly discourage this as it may limit your power intake (this was noticed both by me and readers in my blog – My Experience with Precision Boost Overdrive 2 on a 5900X – Albert Herd, comment by Julien Galland).

For my 5900X, these are the settings that I’ve applied. If you got a 5950X, 5900x 5800x, these values may (or may not) be suitable for you. If you got a 5800X or lower, these values are too high and will hinder performance. Applying lower settings to accommodate your CPU – apply a decent bump to the values quoted below by AMD. Unfortunately, I don’t own anything else apart from a 5900X so I cannot vouch for these settings for other models.

  • If you got very good cooling (such a custom loop or strong cooling in general)
    • PPT – 185W
    • TDC – 125A
    • EDC – 170A
  • If your cooler will get too hot with these settings, try a more conservative setting. In my case, this setting hovers around 70-75C
    • PPT – 165W
    • TDC – 120A
    • EDC – 150A

You might notice that your CPU might run too “cool” or too hot. In this case, adjust your figures accordingly. In a multi core benchmark, these figures should all hit a 100%. In most workloads, its the EDC that plays a role, not TDC (since most workloads are considered as short burst). I also noticed that going too low on EDC will cause instability.

Leave SOC TDC and SOC EDC to 0, these should not impact us (I believe this mostly applies for APUs).

For completeness sake, please keep in mind AMD’s default values when making adjustments to these values:

  • Package Power Tracking (PPT): 142W 5950x, 5900x and 5800x and 88W for 5600x.
  • Thermal Design Current (TDC): 95A 5950x, 5900x and 5800x and 60A for 5600x.
  • Electrical Design Current (EDC): 140A 5950x, 5900x and 5800x and 90A for 5600x.

Curve optimizer

This is probably the most annoying one. The numbers you’re inputting here will vary significantly from one chip to another, so your mileage may vary. These are my values:

  • Negative 11 for the first preferred cores on CCX 0 (as indicated by Ryzen Master)
  • Negative 15 for the second preferred core on CCX 0 (as indicated by Ryzen Master)
  • Negative 17 for the other cores.

If you want to start safe, you can apply a Negative 10 offset on all cores.

Testing this setting is extremely painful. You’ll notice that crashes will not happen under load; crashes will happen under idle conditions, where your CPU undervolts too much. Hopefully, AMD will look at this algorithm in future BIOS updates and provide more stability. In my experience, Geekbench 5 – Cross-Platform Benchmark is a great tool to stress my CPU out, it tends to crash it when the settings are not right.

Please keep in mind the note that I’ve written about the Max CPU Boost Override (under the header – Precision Boost Overdrive 2). Some users note that they prefer to keep Max CPU Boost Override lower and push for a more aggressive curve.

In my next post, we will look at how to get the best performance from your RAM, by applying specific DRAM configurations according to the RAM sticks you own. If you feel adventurous and feel like you can do it on your own:

Thanks for reading!

My Experience with Precision Boost Overdrive 2 on a 5900X

Looking for the TL;DR? These are my everyday settings:

  • PPT – 185W, TDC – 125A, EDC – 170A. To run these power settings, you’ll need a beefy cooler. If the CPU gets too hot with these power settings, try PPT- 165W, TDC – 115A, EDC – 150A
  • Negative 11 for the first preferred cores on CCX 0 (as indicated by Ryzen Master)
  • Negative 15 for the second preferred core on CCX 0 (as indicated by Ryzen Master)
  • Negative 17 for the other cores.
  • These moved my multithreaded Cinebench R20 score from 8250 to around 8800-9000 (6-9% gain) and my single threaded Cinebench R20 score from 630 to 650 (3% gain).

__________________________________________________________________________________________________________________

Recently AMD announced a new algorithm for the Precision Boost Overdrive (PBO), aptly named Precision Boost Overdrive 2 (PBO2). You can read more here: AMD Ryzen™ Technology: Precision Boost 2 Performance Enhancement | AMD and here: AMD Introduces Precision Boost Overdrive 2, Boosts Single Thread Performance | Tom’s Hardware. This post is not intended to explain the technicalities of this feature, rather than how to take advantage of it.

To get started, you will need to navigate to the BIOS. Unfortunately, now you cannot use Ryzen Master to do this, but AMD claims that this will be part of Ryzen Master in their future releases. In the PBO section, you will need to adjust some settings.

Navigating to AMD Overclocking in the BIOS

My specs are as following:

  • AMD Ryzen 5900x
  • ASRock X570 Steel Legend
  • 32GB C17 Memory
  • 750w PSU
  • 240MM AIO from BeQuiet.

At first, naively, I’ve set the power limits (PPT, TDC and EDC) to 0, which means unlimited. This in turn has a negative effect. It will let the CPU get as much power as it can. This translates into unnecessary power consumption, which will limit the maximum clock speed achieved. I’d suggest sticking to values which will keep the CPU under (or close to 80C under full load).

In my case, the maximum power settings I manage to sustain are: PPT – 185W, TDC – 125A, EDC – 170A. The recommended values for your CPU will vary according to the silicon quality and the cooling provided. Cooling 185W is not an easy feat, you’ll need a good cooler (such as a good NH-D15 (noctua.at), some good AIO (I am using Pure Loop | 240mm silent essential Water coolers from be quiet!).

Setting the PPT, TDC and EDC in a well balanced value is extremely important, this will help you strike the balance between the power consumption needed by the CPU while maintaining realistic temperatures. If the CPU gets too hot with these power settings, try PPT- 165W, TDC – 115A, EDC – 150A

I have set the PBO scalar to manual and 10x. I will be honest I am not sure what impact this has, but it looks like a setting which needs tweaking. I’ve tried 1X and honestly I did not feel any difference. From what I can understand, this is the length of how much the CPU will remain pumping high voltage / clocks until it dials it down. In burst scenarios, this should not have any impact.

Max CPU Boost Clock Override should be set to 200MHZ. This allows for higher clock speeds on single threaded workloads. My 5900x can hit 5.15 GHz with this setting on a single core. 5.15 GHZ is not a one-off number. I regularly see this during light workloads

Navigating to the Curve Optimizer in BIOS

Now, for the most important part: The Curve Optimizer. For the best and second core for each CCD, I have set this to negative 10, and for the other cores I have set it to minus 15.

The next step is quite difficult to instruct, as it purely depends on your silicon quality. In my case, I found the following settings to work for me:

  • Negative 11 for the first preferred cores on CCX 0 (as indicated by Ryzen Master)
  • Negative 15 for the second preferred core on CCX 0 (as indicated by Ryzen Master)
  • Negative 17 for the other cores

It took quite a lot of testing to arrive to these figures. You can find the first and second preferred cores from Ryzen Master.

Per Clock adjustments in the Curve Optimizer

Firstly, I started with negative 20 on all cores. This resulted in awesome Cinebench R20 scores but poor stability. I have then went to negative 15 on all cores. This was not bad, but I was experiencing a crash every now and then, especially when the PC is running cold and is able to push more clocks. It would run all day, but on boot, pushing it will instantly result a crash. This tells me that the algorithm was trying to push for more clocks, but the undervolting was too aggressive.

I then went to negative 10 on all cores and it is fully stable. Finally, I pushed negative 15 for those cores which are not first or second. This remained stable, and eventually I started changes the values slightly everday. Sometimes I go too much and get a WHEA BSOD (especially when the PC is cool and under light workloads).

These moved my multithreaded Cinebench R20 score from 8250 to around 8800-9000 (6-9% gain) and my single threaded Cinebench R20 score from 630 to 650 (3% gain). These are small gains, but when they are coming at you with no cost, it’s good to take advantage of it. And yes, these do not really translate to any tangible performance uplift in everyday computing.

Preferred Cores (Star is 1st, dot is second)

The performance uplift is thanks to higher sustained clocks. With PBO turned off, I was sustaining around 4.1 GHz core clock and with PBO on, I am sustaining between 4.4-4.5 GHz in Cinebench R20.

Cinebench scores with PBO2
Full load under Cinebench R20

Simpler workloads (non AVX) will clock past 4.5 GHz. I suspect that Ryzen calms down the clocks by a bit during AVX workloads, but I cannot confirm this.

Full load under a synthetic load – Memtest 64

Please let me know your experience with PBO2 and whether you find this post useful. If you got better settings than mine, I appreciate the feedback! Of course, keep in mind that as AMD said, no processor is the same; some might need more voltage than others to remain stable. It also depends on the power delivery quality, the sustained temperatures, the quality of the thermal paste, the overall case temperature and a plethora of other things, as mentioned in the first link to AMD’s site.

Why doesn’t a virus just terminate your Antivirus process? – Protected Process Light

..because it doesn’t have enough privileges to do so! Starting from Windows 8.1, Protected Process Light (PPL) was introduced. Protected Processes were implemented in Windows Vista (and was mostly focused on DRM), but it was greatly improved, such has having different levels of protection, depending on the application.

There are multiple uses of PPL, but for this post, let’s focus on Antivirus software. We’ll also not be diving deep into how to develop this. If you’re developing this, you probably know far more than me and this blog.

Since Antivirus (AV) software are at the forefront of stopping viruses from harming machines, it’s a very common target for viruses. Normally, AVs place a lot of rules and heuristics inside the application to protect against such threats, but PPL now enables antivirus software to run as a Protected Application under the PPL scheme.

There are multiple levels under the PPL Scheme: from 0 to 7. 0 is no protection and 7 is maximum protection. The kernel is protected under level 7, critical windows components are level 6 and antiviruses run at level 3. Processes with a higher level have more power and will trump over lower levels in terms of accessibility. So, an antivirus cannot terminate a critical windows process, since level 6 is higher than level 3.

Not all Windows Components are protected under the PPL scheme, critical applications such as ssms.exe, csrss.exe, services.exe are under the PPL scheme, running at level 6. Applications such as Task Manager is not under the PPL scheme, and for a very valid reason.

The PPL scheme allows such AVs services to be launched and protected from unloaded untrusted code. Given that an AVs have the PPL value of PROTECTION_LEVEL_CODEGEN_LIGHT (https://docs.microsoft.com/en-us/windows/win32/api/processthreadsapi/ns-processthreadsapi-process_protection_level_information), all DLLs that it loads needs to have a equivalent DLL Signature Level or higher. This ensures that no DLL foul play, such as file replacement or plating takes place. These checks are done at DLL loading level by the Code Integrity Windows component.

If you’re looking to create an application under the PPL scheme, you’ll need to get it signed by Microsoft. Given that only Microsoft can sign applications to contain these kinds of protection levels, viruses can’t have this kind of protection. Keeping in mind that PPLs run more privileged to non-protected processes (even those applications running as Admin), viruses simply cannot terminate AV processes.

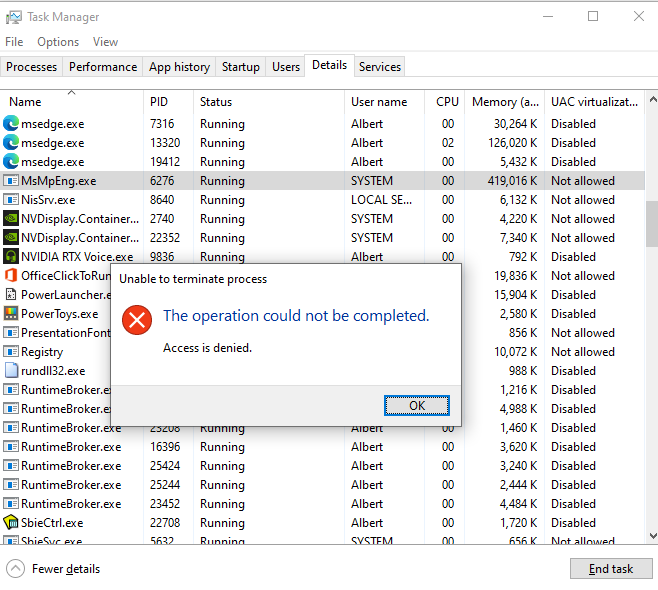
You can see this for yourself – fire up Task Manager (even if admin mode if you’d like) and try to close MsMpEng.exe (Windows Defender Service). If you try to terminate the process, Task Manager will just say “Access Denied”. This is because since Task Manager is not under the PPL scheme, it simply doesn’t have enough rights terminate the AV.

Attempting to terminate MsMpEng.exe

You can read a bit more on how AVs are protected here: https://docs.microsoft.com/en-us/windows/win32/services/protecting-anti-malware-services-

Automating bank cheque analysis by using Microsoft Cognitive Services

Just looking for code? https://github.com/albertherd/ChequeAnalyser

Microsoft Cognitive Services is a rich set of AI services, such as Computer Vision, Speech Recognition, Decision making and NLP. The great thing about these tools is that you don’t really have to be an AI expert to make use of these tools, as these models come pre-trained and production ready. You’ll just feed it your information and let the framework work for you.

We’ll be looking at one area of Microsoft’s Cognitive Services – Computer vision. More specifically, we’ll be looking at the handwriting API – you’ll provide the handwriting and the system will provide you with the actual text. We’ve already worked with the Computer Vision API from Microsoft Cognitive services – we used this API to tag our photo album.

Let’s look at today’s scenario – we’re a fictitious bank which processes bank cheques. These cheques come hand-written from our clients, which contain instructions on how to transfer money from one account to the holder’s account.

A cheque typically has the following information:

  • Issue Date
  • Payee
  • Amount (in digits)
  • Amount (in words, for cross reference)
  • Payer’s account number
  • (Other information, which was omitted for this proof of concept

This is how our fictitious cheque looks like.

Fictitious Cheque
Ficticious cheque – credit: https://www.dreamstime.com/royalty-free-stock-image-blank-check-false-numbers-image7426056

This is how our fictitious cheque looks when we’re looking at the regions we’re interested in, represented in bounding boxes.

0_analysis_template
Cheque Template with bounding boxes representing areas of interest

Let’s consider these three handwritten cheques.

The attached application does the following analysis:

  • Import these cheques as images.
  • Send the images over to Microsoft Cognitive Services
  • Extract all the handwriting / text found in the image
  • Consider only those text which we’re interested in (as represented with bounding boxes previously)
  • Forward this extracted information to whatever system needed. In our case, we’re just printing them to screen.

The below is the resultant information derived from the sample cheques.

ChequeAnalyserResult
Results of Cheque Analysis

Most of the heavy lifting is done by the Microsoft Cognitive Services, making these AI tools available to the masses. Of course, with a bit more business logic, the information that can be extracted from these tools can be greatly improved, making them production ready.

As with the previous example, this example uses the TPL Dataflow library, which is an excellent tool for Actor-Based multithreaded applications.

If you want to try this yourself, you’ll need:

Until the next one!

Watch videos with your friends even if you’re under quarantine or lockdown at home!

Let’s face it – staying at home under quarantine and lockdown due to COVID-19 is not fun at all. You might want to watch some videos in sync with your loved ones. You can take the silly and manual way and say – 3,2,1, PLAY! That may work, but if someone needs to pause, you’ll need to go through that silly 3,2,1 again! What if there are tools to help you out?

Turns out, there is Syncplayhttps://syncplay.pl/. Syncplay is a free tool that allows you to synchronize what video you’re watching, even if you are miles away. It works with modern playback tools; I’ve tested this tool with VLC and it was great.

Let’s set it up! -Firstly, go to https://syncplay.pl/ and download your version. In my case, we’ve tried it on both Windows and Mac and it was great. Once you’ve downloaded it, fire the app up. You’ll need a server so that everyone can connect and play. Syncplay provides free servers to connect to, here’s a list:

  • pl:8995
  • pl:8996
  • pl:8997
  • pl:8998
  • pl:8999

Fill out the following fields:

  • Server Address -> Pick one from the list above
  • Username -> Just your name so your friends can know who is who
  • Default Room -> This should be unique so that only your friends can join. Just pick a fancy name which is unique to you.
  • Path to media player -> Here, we’re telling Syncplay which application to use to play videos. I’m using VLC – find the path of the application and save it.
  • I also recommend “Enable shared playlists” but this is completely optional.

SyncPlayEntryPoint
Syncplay – configuration and connection

Once you’re done – hit “Store configuration and run Syncplay”. If all goes well. Syncplay will show the below screen, and your media player should start. In my case, we’re two people in the room.

SyncPlayConnected
Two people int the same room

To start playing a video, go to Syncplay -> File -> Open Media File -> and navigate and load your file. Make sure that everyone loads the same file with the same name. You’ll get a notification if the file is not the same, such as the below.

SyncPlayFileDifference
File name, size and duration is not the same; you’ve loaded a different file.

If the same file name with the same length is opened, you’ll see the below.

SyncPlayNotReady
Files are the same – just waiting for people to be ready

Once you’re ready, from Syncplay, press I’m ready to watch!

SyncPlayReady
Checkbox to show you’re ready

When everybody is ready, you can proceed and play! Any one person can play and pause video for all the other users in the room. Enjoy synchronized playing!

You can also comment during playback and it will appear in both VLC and Syncplay – it’s like you’re almost next to each other!

SyncPlayChat
Chat appearing both in VLC and Syncplay

There are many other features you can explore in Syncplay:

  • Loading and Sharing a Media Directory
  • Loading a network stream
  • Creating Playlists

Enjoy and stay safe during these turbulent times!

How to avoid getting your credit card details stolen online (some practical ways)

Let’s immediately jump through the points, then some back-story.

  • Only submit credit card details to make a purchase on shops which are super famous, such as Amazon, eBay, official product merchants
  • Use 3rd party paying capabilities where possible, such as PayPal. With this method, the merchant never has access to your credit card details, only to the authorized funds.
  • Ideally use a debit card rather than a credit card online. In case your card gets stolen, the thief can only use the available funds, without ending up in debt.
  • Also, only transfer the money your’re going to use when making the purchase. The card should empty in general.
  • Use applications such as Revolut which have capabilities to enable / disable online transactions on demand.
  • Revolut also allows for disposable credit cards – the number changes every time you make a transaction. This means that even if your credit card is stolen, the card is now dead and worthless. You’ll need to pay a monthly fee, though.
  • Avoid saving credit card details on your browser. Although usually CVV is usually not saved, writing it down again won’t take long. This avoids the possibility of a virus sniffing down your credit card details if they are saved.

Why am I writing these? I’ve just stumbled on a Cyber Security Episode done by MITA / Maltese Police (great initiative, by the way). Although the content made sense, I felt that some practical points were missing (original video here). The premise of the video is to only buy from sites using HTTPS as it’s secure and you’ll know the seller. Some points on the premise:

  • Running HTTPS ONLY GUARANTEES that the transmission between you and the merchant is secure. It does NOT mean you truly know who’s responsible as a merchant. There are ways to “try” and fix this (through EV certificates) but EVs are probably dead as well.
  • What happens after your credit cards are securely transported is unknown. The following may occur:
    1. Merchant might be an outright scammer running a merchant site with an SSL certificate (which nowadays, can be obtained for free, https://letsencrypt.org/)
    2. Merchant might store your credit card details insecurely; he may end up getting hacked and credit card details will get stolen.