Automating bank cheque analysis by using Microsoft Cognitive Services

Just looking for code? https://github.com/albertherd/ChequeAnalyser

Microsoft Cognitive Services is a rich set of AI services, such as Computer Vision, Speech Recognition, Decision making and NLP. The great thing about these tools is that you don’t really have to be an AI expert to make use of these tools, as these models come pre-trained and production ready. You’ll just feed it your information and let the framework work for you.

We’ll be looking at one area of Microsoft’s Cognitive Services – Computer vision. More specifically, we’ll be looking at the handwriting API – you’ll provide the handwriting and the system will provide you with the actual text. We’ve already worked with the Computer Vision API from Microsoft Cognitive services – we used this API to tag our photo album.

Let’s look at today’s scenario – we’re a fictitious bank which processes bank cheques. These cheques come hand-written from our clients, which contain instructions on how to transfer money from one account to the holder’s account.

A cheque typically has the following information:

  • Issue Date
  • Payee
  • Amount (in digits)
  • Amount (in words, for cross reference)
  • Payer’s account number
  • (Other information, which was omitted for this proof of concept

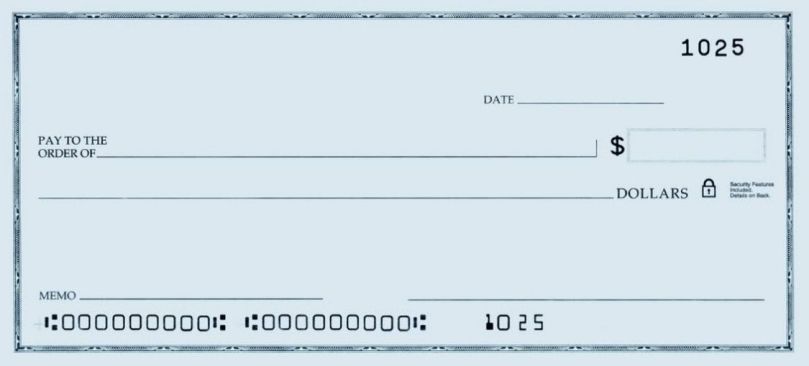
This is how our fictitious cheque looks like.

Fictitious Cheque
Ficticious cheque – credit: https://www.dreamstime.com/royalty-free-stock-image-blank-check-false-numbers-image7426056

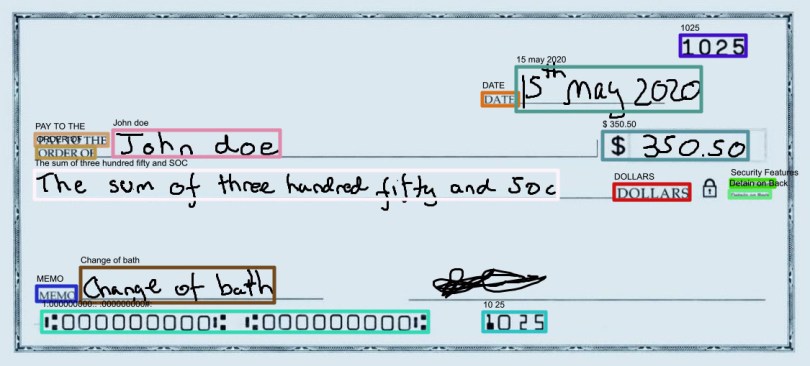
This is how our fictitious cheque looks when we’re looking at the regions we’re interested in, represented in bounding boxes.

0_analysis_template
Cheque Template with bounding boxes representing areas of interest

Let’s consider these three handwritten cheques.

The attached application does the following analysis:

  • Import these cheques as images.
  • Send the images over to Microsoft Cognitive Services
  • Extract all the handwriting / text found in the image
  • Consider only those text which we’re interested in (as represented with bounding boxes previously)
  • Forward this extracted information to whatever system needed. In our case, we’re just printing them to screen.

The below is the resultant information derived from the sample cheques.

ChequeAnalyserResult
Results of Cheque Analysis

Most of the heavy lifting is done by the Microsoft Cognitive Services, making these AI tools available to the masses. Of course, with a bit more business logic, the information that can be extracted from these tools can be greatly improved, making them production ready.

As with the previous example, this example uses the TPL Dataflow library, which is an excellent tool for Actor-Based multithreaded applications.

If you want to try this yourself, you’ll need:

Until the next one!

Tag your photo album using Microsoft Cognitive Services

Just interested in the source code? – https://github.com/albertherd/PhotoTagging

Computer vision is one of the key areas that has seen huge growth in both capability and popularity. Though it seems that it’s still out of reach to many; I honestly felt lost when I was trying to play around in this field. It feels like we’re trying to solve problems which have already been solved by other companies. It seems Microsoft shares this vision though, as they’ve introduced Machine Learning features in the form of SaaS.

I’ve stumbled upon Microsoft Cognitive Services through a presentation and I was genuinely amazed. What’s amazing isn’t the results that this service yields – I’ve expected nothing less than excellent results from such tools. What amazed me is how EASY to get involved – there is no fiddling with following pages and pages of guides just to download, install and play around with some software.

Microsoft Cognitive Services enables you to do a huge array of Machine-Learning powered applications, ranging from vision, decision making, natural language processing and other areas. Let’s play around vision – can we use Microsoft’s Cognitive Vision Services and help us organise our photo library?

The idea is that I have many photos, with subjects ranging from food, vacation, family, friends and whatnot. What if my photos contain the proper EXIF tags such as subject and tags? This will allow me to classify my photos by subject and allow me to search through them. What if I can find my photos instantly instead of sifting manually through thousands of photos? I’ll presume that it’s not just me though, everyone has a smartphone nowadays, so this is everyone’s pain.

Great – now we have an objective! Let’s make the tools work for us now. The process will be simple – upload a photo to Microsoft’s Cognitive Vision Services, get the tags and a nice description and slap it to the actual file. Oh, when I say EXIF tags, these can be viewed in File Explorer like below. (Windows 10 Dark Theme in File Explorer here)

ExifInWindowsExplorer

Ready to tag your photo library? Let’s go!

Get a Microsoft Cognitive Services Account

Since this is an online service, you’ll need to have an active account with Microsoft Azure. Get your free account from here. Don’t worry, the free service is more than enough to get you playing around. I’ve used the free tier to develop, test and write this blog and I still have plenty of free capacity left.

Create a new Cognitive Services Resource and get the API key

Now that you have an active Azure account, navigate to the Azure Portal and create a new Cognitive Services Resource. Follow the wizard and get the service created – choose whatever region works best for you. I’ve chosen West Europe and the free tier in my case. Once it’s created, we’ll need two things – the URL to our endpoint and our API Key. From the quick start page, get API endpoint and the API Keys.

Get your photos tagged!

Okay, we got all the resources needed, it’s time to get some work done! I’ve created an application to get a photo, upload it our new Cognitive Services resource, get tags and description and apply it to our photo.
Follow these steps to get your photo tagging game going!

  1. Download / Clone my application from GitHub
  2. Open the application and navigate to PhotoAnalyser.cs. Change the subscriptionKey and uriBase to the ones you got previously. The keys in the solution are placeholder keys only.
  3. Run the application – have your photo directory ready as this is asked for at runtime.
  4. Let it do its magic!

In the below example, photo analysis tells us that it’s a pizza on a plate and it also gave us some appropriate tags. Try downloading and viewing the pizza photo -tags and title are preserved as EXIF data.

Keep in mind that the code in the provided solution is not production ready – it’s merely meant as a playground.

Explore the solution

What’s the fun of having a piece of software working without knowing how it works underlying? Here are some points about the application, in no particular order:

  1. It’s making one of the excellent TPL Dataflow framework from Microsoft – this enables the application to scale with ease and to work around the pesky throttling that the free tier carries with it.
  2. It is resizing the images since they don’t need to be large, plus this speed the process up.
  3. It’s using the ImageSharp to resize and add Exif tags to the images.
  4. Given that this application is manipulating images, it is memory intensive. I’ve seen this image hit close to 4GB in memory usage.
  5. It’s split into a library and a consumer just in case.

Continue exploring the Microsoft Cognitive Services stack

Computer vision is just one of the areas in the Microsoft Cognitive Services stack; there are other excellent services to enrich your applications. They also have excellent documentation on this; I’ve followed this to build my application.

That’s it for today! This was an extremely fun project to learn and experiment with new technologies! Until the next one.