Looking for the TL;DR? These are my everyday settings:
- PPT – 185W, TDC – 125A, EDC – 170A. To run these power settings, you’ll need a beefy cooler. If the CPU gets too hot with these power settings, try PPT- 165W, TDC – 115A, EDC – 150A
- Negative 11 for the first preferred cores on CCX 0 (as indicated by Ryzen Master)
- Negative 15 for the second preferred core on CCX 0 (as indicated by Ryzen Master)
- Negative 17 for the other cores.
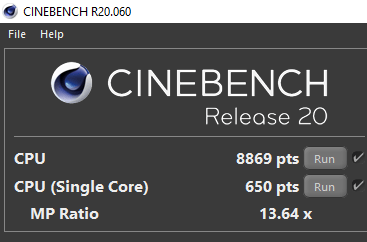
- These moved my multithreaded Cinebench R20 score from 8250 to around 8800-9000 (6-9% gain) and my single threaded Cinebench R20 score from 630 to 650 (3% gain).
__________________________________________________________________________________________________________________
Recently AMD announced a new algorithm for the Precision Boost Overdrive (PBO), aptly named Precision Boost Overdrive 2 (PBO2). You can read more here: AMD Ryzen™ Technology: Precision Boost 2 Performance Enhancement | AMD and here: AMD Introduces Precision Boost Overdrive 2, Boosts Single Thread Performance | Tom’s Hardware. This post is not intended to explain the technicalities of this feature, rather than how to take advantage of it.
To get started, you will need to navigate to the BIOS. Unfortunately, now you cannot use Ryzen Master to do this, but AMD claims that this will be part of Ryzen Master in their future releases. In the PBO section, you will need to adjust some settings.

My specs are as following:
- AMD Ryzen 5900x
- ASRock X570 Steel Legend
- 32GB C17 Memory
- 750w PSU
- 240MM AIO from BeQuiet.
At first, naively, I’ve set the power limits (PPT, TDC and EDC) to 0, which means unlimited. This in turn has a negative effect. It will let the CPU get as much power as it can. This translates into unnecessary power consumption, which will limit the maximum clock speed achieved. I’d suggest sticking to values which will keep the CPU under (or close to 80C under full load).
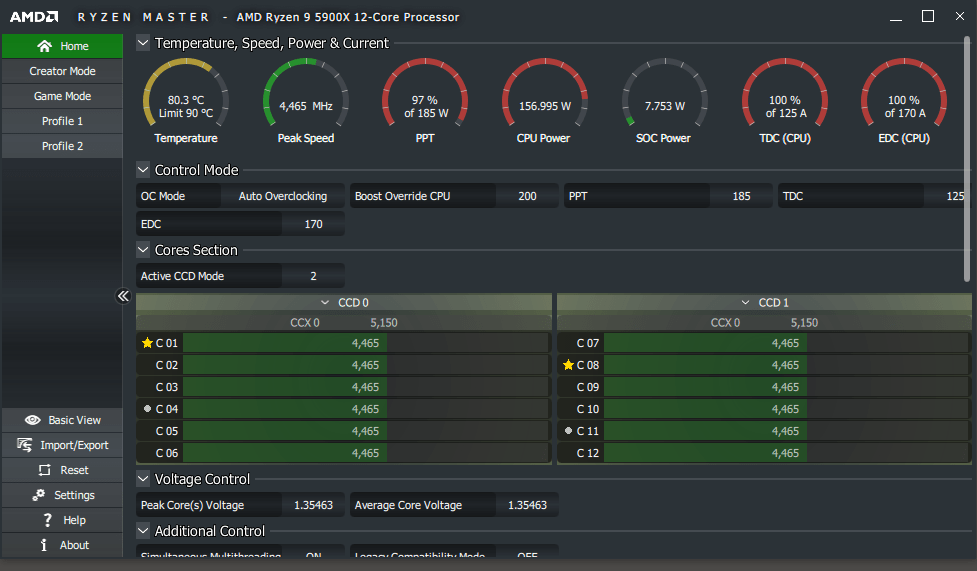
In my case, the maximum power settings I manage to sustain are: PPT – 185W, TDC – 125A, EDC – 170A. The recommended values for your CPU will vary according to the silicon quality and the cooling provided. Cooling 185W is not an easy feat, you’ll need a good cooler (such as a good NH-D15 (noctua.at), some good AIO (I am using Pure Loop | 240mm silent essential Water coolers from be quiet!).
Setting the PPT, TDC and EDC in a well balanced value is extremely important, this will help you strike the balance between the power consumption needed by the CPU while maintaining realistic temperatures. If the CPU gets too hot with these power settings, try PPT- 165W, TDC – 115A, EDC – 150A
I have set the PBO scalar to manual and 10x. I will be honest I am not sure what impact this has, but it looks like a setting which needs tweaking. I’ve tried 1X and honestly I did not feel any difference. From what I can understand, this is the length of how much the CPU will remain pumping high voltage / clocks until it dials it down. In burst scenarios, this should not have any impact.
Max CPU Boost Clock Override should be set to 200MHZ. This allows for higher clock speeds on single threaded workloads. My 5900x can hit 5.15 GHz with this setting on a single core. 5.15 GHZ is not a one-off number. I regularly see this during light workloads

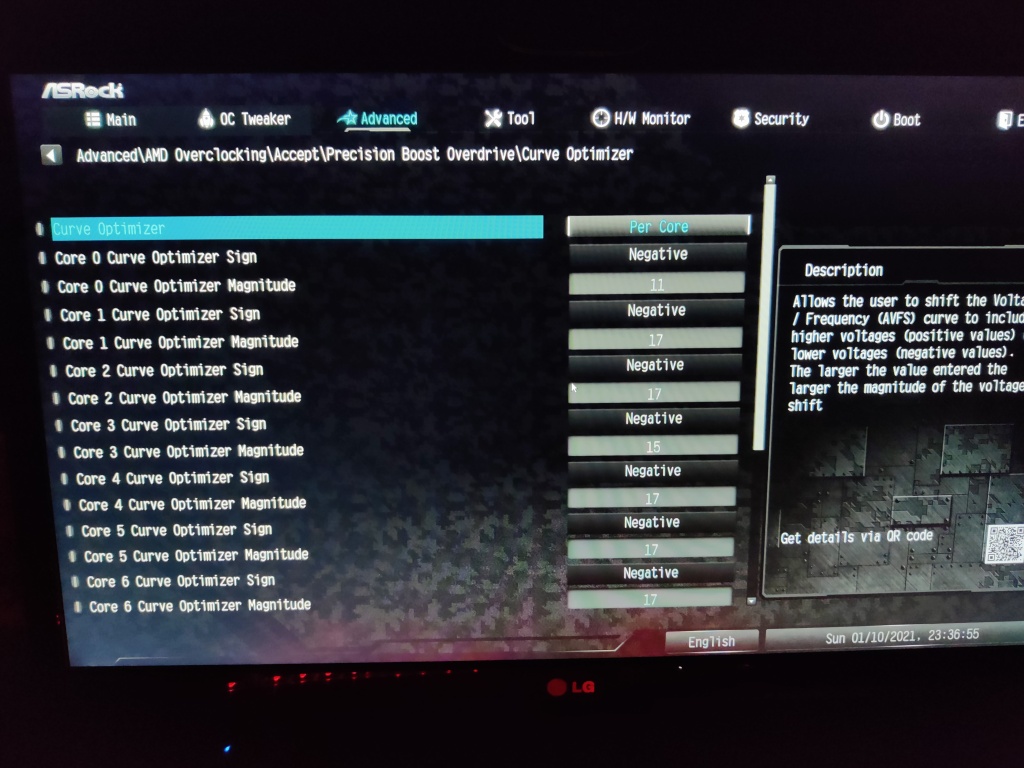
Now, for the most important part: The Curve Optimizer. For the best and second core for each CCD, I have set this to negative 10, and for the other cores I have set it to minus 15.
The next step is quite difficult to instruct, as it purely depends on your silicon quality. In my case, I found the following settings to work for me:
- Negative 11 for the first preferred cores on CCX 0 (as indicated by Ryzen Master)
- Negative 15 for the second preferred core on CCX 0 (as indicated by Ryzen Master)
- Negative 17 for the other cores
It took quite a lot of testing to arrive to these figures. You can find the first and second preferred cores from Ryzen Master.
Firstly, I started with negative 20 on all cores. This resulted in awesome Cinebench R20 scores but poor stability. I have then went to negative 15 on all cores. This was not bad, but I was experiencing a crash every now and then, especially when the PC is running cold and is able to push more clocks. It would run all day, but on boot, pushing it will instantly result a crash. This tells me that the algorithm was trying to push for more clocks, but the undervolting was too aggressive.
I then went to negative 10 on all cores and it is fully stable. Finally, I pushed negative 15 for those cores which are not first or second. This remained stable, and eventually I started changes the values slightly everday. Sometimes I go too much and get a WHEA BSOD (especially when the PC is cool and under light workloads).
These moved my multithreaded Cinebench R20 score from 8250 to around 8800-9000 (6-9% gain) and my single threaded Cinebench R20 score from 630 to 650 (3% gain). These are small gains, but when they are coming at you with no cost, it’s good to take advantage of it. And yes, these do not really translate to any tangible performance uplift in everyday computing.

The performance uplift is thanks to higher sustained clocks. With PBO turned off, I was sustaining around 4.1 GHz core clock and with PBO on, I am sustaining between 4.4-4.5 GHz in Cinebench R20.
Simpler workloads (non AVX) will clock past 4.5 GHz. I suspect that Ryzen calms down the clocks by a bit during AVX workloads, but I cannot confirm this.

Please let me know your experience with PBO2 and whether you find this post useful. If you got better settings than mine, I appreciate the feedback! Of course, keep in mind that as AMD said, no processor is the same; some might need more voltage than others to remain stable. It also depends on the power delivery quality, the sustained temperatures, the quality of the thermal paste, the overall case temperature and a plethora of other things, as mentioned in the first link to AMD’s site.

