This is part of a tutorial series. If you feel a bit lost, I suggest following the tutorial in order:
- Connecting a DS18B20 thermal sensor to your Raspberry Pi – Raspberry Pi Temperature Monitoring Part 1
- Connecting a LCD1602 with an I2C module to your Raspberry Pi – Raspberry Pi Temperature Monitoring Part 2
Just interested in the code? – https://github.com/albertherd/DS18B20Reader
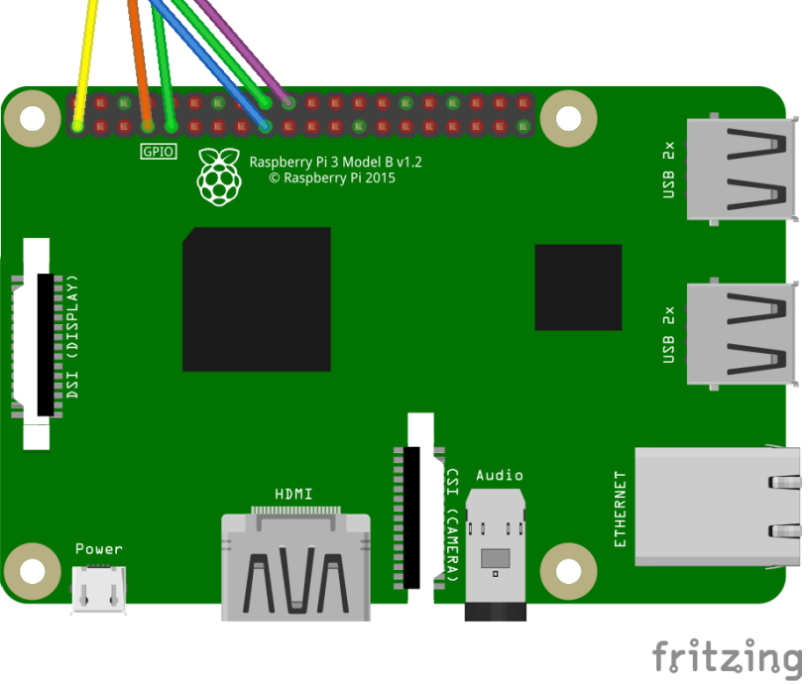
Since you made it here, great! Your Raspberry Pi should have one or more DS18B20 thermal sensors connected, like the image below.

Now that we have our DS18B20 thermal sensor connected to our Raspberry Pi, it’s time to do some programming to read out the temperature! Our application will need to be able to the following tasks:
- Discover all the DS18B20 sensors (in my case, I’ve connected 2 but this application should handle an arbitrary number of sensors).
- Assign a friendly name so we’ll know which sensor is which and store them in a list.
- Retrieve and parse the information from the device.
- Do whatever necessary with the gathered information.
1) Discover all the DS18B20 sensors
First and foremost, our code cannot just assume that devices just exist on the system – we’ll need to go and discover these devices. Since the DS18B20 makes use of the 1-Wire protocol, devices will live under the /sys/bus/w1/devices/ directory. Therefore, our code will need to devices living under this directory, whose names start with 28 since all DS18B20 device names will start with 28. Let’s start by knowing how many devices are connected.
typedef struct Sensor
{
    char *SensorName;
    FILE *SensorFile;
} Sensor;

typedef struct SensorList
{
    Sensor **Sensors;
    int SensorCount;
} SensorList;

DIR *dir;
struct dirent *dirEntry;

SensorList *sensorList = malloc(sizeof(SensorList));
sensorList->SensorCount = 0;

if(!(dir = opendir("/sys/bus/w1/devices/")))
    return sensorList;

while((dirEntry = readdir(dir)))
{
    if(strncmp(dirEntry->d_name, "28", 2) == 0)
    {
        sensorList->SensorCount++;
    }
}
2) Assign a friendly name so we’ll know which sensor is which and store them in a list
Now that we’ve discovered the devices connected to the system, it’s time to save a reference and optionally a friendly name as well. Logic mostly applies from step 1.
sensorList->Sensors = malloc(sizeof(Sensor*) * sensorList->SensorCount);
Sensor **currentSensor = sensorList->Sensors;

int sensorNamesAllocated = 0;
while((dirEntry = readdir(dir)))
{
    if(strncmp(dirEntry->d_name, "28", 2) == 0)
    {
        char *sensorName;
        if(sensorNamesCount > sensorNamesAllocated)
        {
            sensorName = strdup(*sensorNames);
            sensorNames++;
        }
        else
        {
            sensorName = strdup("Sensor");
        }

        char sensorFilePath[64];
        sprintf(sensorFilePath, "%s%s%s",  "/sys/bus/w1/devices/", dirEntry->d_name, "/w1_slave");
        *currentSensor = GetSensor(sensorFilePath, sensorName);
        currentSensor++;
    }
}

Sensor *GetSensor(char *sensorId, char *sensorName)
{
    Sensor *sensor = malloc(sizeof(Sensor));
    sensor->SensorFile = fopen(sensorId, "r");
    sensor->SensorName = sensorName;
    return sensor;
}
3) Read the temperature from the device
This is the most exciting part – we actually get to read the temperatures! Using the sensor information we got from steps 1 and 2, we can get the device, open it as a file, extract the readings and parse it accordingly. Using the FILE API makes it very easy to do so – grab all the contents and store it in a buffer. As mentioned in the first tutorial, the content of the file looks as follows –
0b 01 55 05 7f 7e 81 66 bf : crc=bf YES
0b 01 55 05 7f 7e 81 66 bf t=16687
We’re only intereested in the t= component, so some string manipulation and float conversion will take the 16687 and convert it into 16.687C. We’re also doing some range checking since the DS18B20 is rated between -55C and +125C
long deviceFileSize;
char *buffer;

FILE *deviceFile = sensor->SensorFile;
fseek(deviceFile, 0, SEEK_END);
deviceFileSize = ftell(deviceFile);
fseek(deviceFile, 0, SEEK_SET);

buffer = calloc(deviceFileSize, sizeof(char));

fread(buffer, sizeof(char), deviceFileSize, deviceFile);
char *temperatureComponent = strstr(buffer, "t=");
if(!temperatureComponent)
{
    free(buffer);
    return -1;
}

temperatureComponent +=2; //move pointer 2 spaces to compensate for t=

float temperatureFloat = atof(temperatureComponent);
temperatureFloat = temperatureFloat / 1000;

if(temperatureFloat  125)
    temperatureFloat = 125;

free(buffer);
return temperatureFloat;
4) Do whatever necessary with the gathered information
We now have the information at hand, great! We can do many sort of things with it, such as sending an email, activating some other device or whatever is necessary. For demo purposes, we’re simply going to output the contents to the console just to see it working. This is in a loop so we’ll keep reading the temperature until the application exits.
 while(1)
    {
        for(int i = 0; i SensorCount; i++)
        {
            char dateTimeStringBuffer[32];
            strftime(dateTimeStringBuffer, 32, "%Y-%m-%d %H:%M:%S", localtime(¤tTime));

            float temperature = ReadTemperature(sensorList->Sensors[i]);
            printf("%s - %s - %.2fC\n", dateTimeStringBuffer, sensorList->Sensors[i]->SensorName, temperature);
        }
    }
To try out the code as a whole solution, grab a copy from GitHub – https://github.com/albertherd/DS18B20Reader
In a terminal with git and cmake installed, run the following commands
git clone https://github.com/albertherd/DS18B20Reader

cd ./DS18B20Reader

cmake . && make && ./DS18B20Reader "Sensor"
If the output looks like the below, congratulations!

In the next tutorial, we’ll pick up from here and we’ll start outputting the content on an LCD1602! Until the next one.
[…] Using C to monitor temperatures through your DS18B20 thermal sensor […]
LikeLike
[…] Using C to monitor temperatures through your DS18B20 thermal sensor […]
LikeLike